
User's Guide
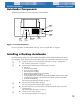


Installing the Autoloaders Installing the Internal Autoloader
20
Installing the Internal Autoloader
The following sections describe how to install an internal autoloader.
Internal Autoloader Installation Summary
The internal autoloader is installed horizontally in a 5.25-inch, full-height drive bay. Installing the
internal autoloader involves the following steps:
1. Configuring the Internal Autoloader
2. Mounting the Internal Autoloader
3. Connecting the SCSI Interface Cable
4. Installing SCSI Termination
5. Connecting the Power Cord
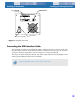
Configuring the Internal Autoloader
The internal autoloader is configured using jumpers and DIP switches. Table 3 shows the default
configuration for the internal autoloader.
If these default settings are appropriate for your computer, skip to “Mounting the Internal
Autoloader” on page 24.
Table 3. Default Configuration (Internal Drive)
Parameter Default Setting Configuration Method
SCSI ID 6 Jumpers
Parity Checking Enabled Jumpers
SCSI Termination Power Disabled Jumpers
Data Compression Enabled DIP switches
Media Recognition System
(MRS) Verification
Enabled DIP switches
Power On Self Test (POST)
Diagnostics
Enabled DIP switches
Host Operating System Windows 98 SE/ME/NT 4.0/
2000/XP/Windows Server 2003
DIP switches