
User's Guide


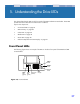

Understanding the Drive LEDs Drive LED
40
Drive LED
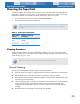
The amber Drive LED lets you know when data is being read from or written to tape. It also informs
you when a hardware fault occurs.
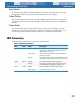
Table 10. Drive LED
LED Status Description
ON continuously The drive is reading or writing the tape (SCSI or tape movement is
present).
Flashing rapidly A hardware fault occurred. If the fault occurs immediately after
powering on the drive, the Power On Self Test (POST) switch (switch 4)
is enabled and a POST has failed. If the front panel LEDs are flashing
together, contact the Technical Support department.
If the Drive LED is flashing rapidly during drive operation, press the
Eject button to remove the tape. If the tape does not eject within 2
minutes, press and hold the Eject button for more than 5 seconds. The
tape should eject within 40 seconds. Contact Technical Support for
more information.
CAUTION: If you push the Eject button while the Drive LED is ON, you will interrupt any host
operation, causing an application error. It may not be possible to append to the tape if a write
operation is aborted in this way.
NOTE: If your backup software issues a SCSI “Prevent Media Removal” command, the Drive
LED remains ON and the Eject button is disabled, so that the tape cannot be ejected
accidentally. To eject the tape, use your backup software’s Eject command.