
Quick Start Guide


Installing the Internal DAT 320 Tape Drive in Your Server 9
DAT 320
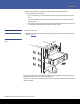
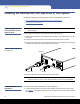
Mounting Hardware Used
1 Use M3 screws. Check that the holes in the chassis are aligned with the holes in the
sides of the drive and use a regular Phillips screwdriver to secure the M3 screws (see
Figure 6
).
Figure 6 Securing Drive, No
Mounting Hardware Used
2 Ensure blanking plates are in place over empty bays and replace the cover on the
server.
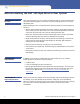
Completing Your
Installation
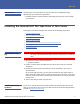
To complete and test your internal tape drive installation:
1 Use the screws you removed earlier to secure the drive in place.
2 Replace the computer cover.
3 Reconnect the power cord to the computer’s power connector.
4 Turn on the computer.
5 If necessary install the DAT320 O/S driver.
6 Install your backup software program. The documentation that came with your
software should describe this procedure.
7 Gently insert a tape cartridge into the internal tape drive’s slot. Slide the cartridge
into the slot until the drive accepts the cartridge and loads it. A brief delay occurs
while the drive identifies the cartridge type and state, and moves the tape to the
data area. Then the green Ready LED goes ON.
8 Use your backup software application to perform a sample backup-and-verify
operation. The Ready green LED flashes as data is written to and/or read from the
tape.
9 At the end of the operation, press the
Eject button on the front of the internal tape
drive to eject the cartridge from the drive.
M3 screws, supplied
with tape drive