QUARTZ TIME RECORDER Simplex 500 OPERATION MANUAL
Bescheinigung des Herstellers/Importeurs Dies Gerät entspricht den Bedingungen der Niederspannungs-Vorschrift 73/23/EEC und dem EMVG nach 89/336/EEC. This unit complies with the Low Voltage Directive 73/23/EEC and the EMC Directive 89/336/EEC. Maschinenl ärminformationsverordnung 3. GSGV, 18.01.1991: Der arbeitsplatzbezogene Schalldruckpegel beträgt 70 dB (A) oder weniger gemäß ISO 7779. Die zugehörige Steckdose muß nahe beim Gerät angebracht und leicht zugänglich sein. 1.
TABLE OF CONTENTS 1. PRECAUTIONS 1 2. FEATURES 3 3. BEFORE USING THE TIME RECORDER 4 Accessories 4 Features 4 Installing the Ribbon Cassette 5 Wall Mounting 6 Environmental Conditions 6 4. DAILY OPERATIONS 7 5. SETTING 8 Preparation for setting 8 Setting the Pay Period 9 Setting the Date and the Time, 1/60 or 1/100 printing, and the 12/24 HOUR format 12 Setting the Day Advance Time 14 Setting the Daylight Saving Time (D.S.T.
1. PRECAUTIONS This operation manual is prepared for safe and proper use of the unit. Please follow all the instructions to avoid possible danger to yourself or others and damage to the unit. Signs Various warnings and cautions are provided throughout this manual along with signs. Remember each sign and its explanation listed below for your safety and proper operation of the unit. Warning Improper handling may cause bodily accidents including death and serious injury.
2. FEATURES • The time table program provides the following functions: •Automatic switching between black and red printing The two-color printing system makes it possible to easily see an employee's in and out time. •Automatic activation of an external time signal The unit can be programmed to externally output a signal when it's time to start or quit, or for breaks.
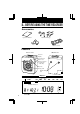
3. BEFORE USING THE TIME RECORDER Accessories Operation Manual Wall mount fittings Keys Ribbon cassette Features Card slot Display Control button Panel cover Panel open button (at both sides of the unit) Key hole Analog clock Wall-mounting hole Day of the week indication Daylight saving time indication 12Hr.
Installing the Ribbon Cassette Panel cover Panel open button (at both sides of the unit) 1 Unlock the unit. While holding down the panel, open buttons at both sides of the unit, and lift the panel cover away from you. 2 Turn the knob on the cassette in the Key hole Panel house arrow-indicated direction to make the ribbon taut. To insert the ribbon cassette inside the unit, lift the panel house away from you first. Then thread the ribbon between the ribbon mask and the print head.
Wall Mounting The unit can be mounted on a wall using the supplied mounting fittings. To mount the unit on a wall, take the following steps: 1 Install the two larger screws into a wall 3.94 inches (10 cm) apart. Be sure to keep about 0.12 inch (3 mm) of the screw head out of the wall. The supplied screws are intended for use on a thick wooden wall or wooden column. Do not use them on any other materials. There is a danger that the unit may come off. 4 3.9 (3m 0.
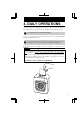
4. DAILY OPERATIONS Once the AC line cord is plugged into the outlet, the unit can be used immediately as basic operation has been pre-set at the factory, including the time and the closing date. See "3 BEFORE USING THE TIME RECORDER". It is easy to operate the unit. Just insert a time card. The card is then automatically pulled in, printed and then ejected. Do not let any metallic object get into the slot, including paper clips. Do not forcefully push in a card, either.
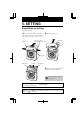
5. SETTING Preparation for setting To prepare for setting: 1 2 Unlock the unit. While holding down Remove the panel cover. the panel, open buttons at both sides of the unit and lift the panel cover away from you. Panel open button (at both sides of the unit) Panel cover Key hole Panel house Display Control button 3 Make settings using the display and control buttons at the panel house. Be sure to make settings with the power on.
Setting the Pay Period • The closing date is factory-set at the end of a month (31st). • The PAY ENDING button stays lit up during its setting operation. Monthly Closing Card type 00 Monthly closing 01 Weekly closing 02 Bi-weeky closing Closing date 12Hr. SU MO TU WE TH FR 1 Remove the panel cover. Make sure that PAY ENDING stays lit up. SA 1/60 1/100 YEAR MONTH RED/BLK. EX.ALM PAY ENDING DAY COL. HOUR DATE/TIME DAY ADV.TIME MINUTE D.S.
Weekly Closing 12Hr. SU MO TU WE TH FR 1 Remove the panel cover. SA 1/60 Make sure that the PAY ENDING button stays lit up. 1/100 YEAR MONTH RED/BLK. EX.ALM PAY ENDING DATE/TIME DAY COL. HOUR DAY ADV.TIME MINUTE SECOND/CARD D.S.T PROGRAM EXT.ALARM SELECT SET 2 Press or to cause the digits at the right to flash ("00") . Weekly closing 12Hr. SU MO TU WE TH FR 3 Press SA or to select "01". 1/60 1/100 YEAR MONTH RED/BLK. EX.ALM PAY ENDING DATE/TIME DAY COL.
Bi-Weekly Closing 12Hr. SU MO TU WE TH FR 1 Remove the panel cover. SA 1/60 Make sure that the PAY ENDING stays lit up. 1/100 YEAR MONTH RED/BLK. EX.ALM PAY ENDING DATE/TIME DAY COL. HOUR DAY ADV.TIME MINUTE D.S.T SECOND/CARD PROGRAM EXT.ALARM SELECT SET SU MO TU WE TH FR SA 1/100 PAY ENDING DATE/TIME DAY COL. HOUR DAY ADV.TIME MINUTE D.S.T SECOND/CARD PROGRAM EXT.ALARM SELECT SET Today is printed on the ninth line from the top. 12Hr.
Setting the Date and the Time, 1/60 or 1/100 printing, and the 12/24 HOUR format The DATE/TIME button stays lit up during its setting operation. 1/60, 1/100 printing 12Hr. SU MO TU 1 Press SELECT to illuminate the second button from the left, DATE/TIME . Date is indicated at the left, and time at the right on the display. To set the number, the digits must flash. Time WE TH FR SA 1/60 1/100 YEAR MONTH RED/BLK. EX.ALM Date PAY ENDING DATE/TIME DAY COL. HOUR DAY ADV.TIME MINUTE D.S.
12Hr. SU MO TU WE TH FR 4 SA 1/60 1/100 YEAR MONTH RED/BLK. EX.ALM PAY ENDING DATE/TIME DAY COL. DAY ADV.TIME HOUR MINUTE D.S.T SELECT Example of printing: In the case of 14:58 1/60 indication 14:58 1/100 indication 14.98 SECOND/CARD PROGRAM EXT.ALARM Setting for 1/60 or 1/100 printing Press or to cause the digits at the upper left to flash. Press or to select the printing between 1/60 or 1/100. SET 5 Check the settings on the display and press SET .
Setting the Day Advance Time The day advance time refers to the time when printing shifts to the next line on a time card for the next day. This function, if printed before the set day advance time, enables the time record to print on the same line of the previous working day even if leaving time is after midnight. • The day advance time is factory-set at 5:00 a.m. (05:00). • The DAY ADV. TIME button stays lit up during its setting operation. 1 Press SELECT to cause the third button from the left, DAY ADV.
Setting the Daylight Saving Time (D.S.T.) Daylight saving time function 1 D.S.T. execution time At 2:00 a.m. on the first day of summer time, the clock automatically gains one hour to show 3:00 a.m. When 3:00 a.m. comes on the last day of the summer time period, it loses one hour and returns to 2:00 a.m. 2 Setting D.S.T.
• Daylight saving time is not pre-set at the factory (with the indication of month 00 and day 00). • The D.S.T. button stays lit up during its setting operation. 1 Press SELECT to cause the fourth button from the left, D.S.T. , to light up. 12Hr. Start date of D.S.T. SU MO TU WE TH FR SA 1/60 1/100 YEAR MONTH RED/BLK. EX.ALM PAY ENDING DATE/TIME DAY COL. HOUR DAY ADV.TIME MINUTE D.S.T SECOND/CARD PROGRAM EXT.
3 Setting the end date When the start date setting is completed, the indication at the upper left automatically shifts to "02". You are now in the end date setting mode. 12Hr. End date of D.S.T. SU MO TU WE TH FR SA 1/60 1/100 YEAR MONTH RED/BLK. EX.ALM PAY ENDING DATE/TIME DAY COL. HOUR DAY ADV.TIME MINUTE D.S.T SECOND/CARD PROGRAM EXT.ALARM SELECT SET (1) Press or to cause digits to flash, and then press or to select the desired time. Example: If D.S.
Setting the Time Table Program The time table program function allows automatic selection of print color (black or red), an external time signal, and automatic selection of a column to print records in. These functions can be set by the day of the week and time period. • No time table program is factory-set. (The default is: print in black; no external time signal; and print in Column 1.) • The PROGRAM button stays lit up during its setting operation.
Follow these steps to set time table programs. 1 Press SELECT to cause the PROGRAM button light up. Day of the week to be set Program No. 12Hr. SU MO TU WE TH FR SA 1/60 Print color 00 Black 01 Red 1/100 YEAR MONTH RED/BLK. EX.ALM PAY ENDING DATE/TIME SELECT External time signal 00 Disabled (no setting) 01 Enabled DAY COL. DAY ADV.TIME HOUR MINUTE D.S.T SECOND/CARD PROGRAM Time to be set EXT.ALARM SET Print column 01 Column 1 02 Column 2 . . .
P-01 Print in red 12Hr. SU MO TU WE TH FR 2 SA 1/60 1/100 YEAR MONTH RED/BLK. EX.ALM PAY ENDING DATE/TIME DAY COL. HOUR DAY ADV.TIME MINUTE D.S.T SECOND/CARD PROGRAM EXT.ALARM SELECT SET 12Hr. SU MO TU WE TH FR SA 1/60 1/100 YEAR MONTH RED/BLK. EX.ALM PAY ENDING DATE/TIME DAY COL. HOUR DAY ADV.TIME MINUTE D.S.T SECOND/CARD PROGRAM EXT.ALARM SELECT SET To set P-01 (shown in the table above) (1) Print color With "P-01" flashing, press once.
00 minute 12Hr. SU MO TU WE TH FR SA Press again. The minute indication flashes. Leave the digits as they are since the desired time is 05:00 in this case. 1/60 1/100 YEAR MONTH RED/BLK. EX.ALM PAY ENDING DATE/TIME DAY COL. HOUR DAY ADV.TIME MINUTE D.S.T SECOND/CARD PROGRAM EXT.ALARM SELECT SET 12Hr. SU MO TU WE TH FR (5)Day of the week Press . The bar under "SU" flashes ("-"). SA 1/60 1/100 YEAR MONTH RED/BLK. EX.ALM PAY ENDING DATE/TIME DAY COL. HOUR DAY ADV.
Erase "-" under MO - SA. 12Hr. SU MO TU WE TH FR SA 1/60 1/100 YEAR MONTH RED/BLK. EX.ALM PAY ENDING DATE/TIME DAY COL. HOUR DAY ADV.TIME MINUTE D.S.T SECOND/CARD PROGRAM EXT.ALARM SELECT SET 12Hr. SU MO TU WE TH FR The P-01 indication stays lit up completing the P-01 program setting. SA 1/60 Staying lit up Take the same steps described above to erase the bars for the remaining days of the week. After erasing the bar under "SA", press SET . 1/100 YEAR MONTH RED/BLK. EX.
P-03 12Hr. External time signal 4 To set P-03 Make the bars under MO-SA light up SU MO TU WE TH FR Make settings as shown in the figure at left, and press SET . SA 1/60 1/100 YEAR MONTH RED/BLK. EX.ALM PAY ENDING DATE/TIME DAY COL. HOUR DAY ADV.TIME MINUTE D.S.T SECOND/CARD PROGRAM EXT.ALARM SELECT SET P-04 5 To set P-04 12Hr. SU MO TU WE TH FR Make settings as shown in the figure at left, and press SET . SA 1/60 1/100 YEAR MONTH RED/BLK. EX.
To check program settings Press SELECT to cause PROGRAM to light up. Make the desired program No. flash. To see program settings, press . The button switches among programs in order starting from P-01. Program contents are shown on the display in order starting from Sunday and the line feed time. To modify program settings Press SELECT to cause PROGRAM to light up. Make the desired program No. flash. Press , , , or to change the settings in the same manner as in its initial setting.
Setting Number of Seconds for External Time Signal This function sets the duration of the external time signal. The setting is enabled only when external time signal is set in the time table program. • The duration is factory-set at 5 seconds. • The EXT. ALARM button stays lit up during its setting operation. 1/60 1 Press SELECT to cause 1/100 EXT. ALARM to light up. 12Hr. YEAR RED/BLK. PAY ENDING SU MONTH EX.ALM DATE/TIME MO TU DAY COL. WE HOUR DAY ADV.TIME TH FR MINUTE D.S.
Resetting To restore all the settings to factory-shipped state, push the reset switch with a pointed object. Reset switch Be careful! Resetting will erase all the settings made by users. For setting, see "5 Setting".
6. CONNECTING TO AN EXTERNAL TIME SIGNAL Follow the steps below to connect to an external time signal device. 1 Unscrew the screw fixed on the bottom of the unit to remove the lid. Screw Lid 2 Insert two wires for an external time signal while pushing the upper part of the terminal board with a screwdriver. 3 Replace the lid after pulling the wires through the U-shaped cut provided on the lid.
7. INSTALLING THE Ni-Cd BATTERY (OPTIONAL) Follow the steps below to install a Ni-Cd battery (optional) in case of power failure. 1 Unscrew the screw that holds the lid of the battery compartment in the lower right-hand corner of the back of the unit. Screw 2 Insert the battery connector into the compartment connector to install the battery. Connector 3 Hook the lid to close, and secure it with the screw. Use only the originally offered Ni-Cd Battery.
9. SPECIFICATIONS Clock display Monthly accuracy ± 15s (at ordinary temperature) Calendar Year up to 2096. Automatically adjusted to leap years, 31-day months and months with thirty or fewer days, and the days of the week.
10. TIME CARD SPECIFICATIONS Note : Recommended paper thickness : 0.45 ± 0.05mm Note : Card style may vary.
(2) Weekly Card 32 (3) Bi-Weekly Card
Printed in Japan 1406-9806 10-10B01S