
Service manual


- 18 -
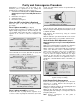
To Check Purity:
When Receiver is in Service Mode (red “CHK” is displayed), place a jumper in the AG connector between the
terminals (shorting FB signal to ground). Press the Recall Button on the Remote Control to enter the White Purity
Field Check Mode. Remove the jumper from the AG connector and press Recall repeatedly to toggle the Receiver
into the Red/Green/Blue Purity Field Check Modes.
Note: if jumper is not removed, colors will be displayed at high luminosity.
In Aging Mode (factory mode, yellow “CHK” is displayed), place a jumper in the AG connector between the
terminals. Press Recall on the Remote Control to enter the Purity Field Check Mode.
Other Adjustment
Default Level
(Without FM)
Default
Level
(With FM)
X0 AFCT 60 83
X1 AFCB 29 44
X2 AFCC 42 64
X3 CLOCK 128 128
CH
CH
PW
TO B ITEMS
Helpful Hints
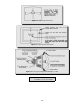
Entering Service Mode (Back-Open Method)
1. While the Receiver is ON and operating in Normal Mode, momentarily
short test point FA1 (TP8) to Cold Ground ( ) FA2 (TP3) A-Board.
The Receiver enters the Aging Mode
.
Yellow letters “CHK” appear in the upper left corner of the CRT.
(The Volume Up/Down will adjust rapidly).
2. Simultaneously press the Action and the Volume Up buttons on the
Receiver Control Panel.
The Receiver enters the Service Mode.
The letter in “CHK” turn red.
(The Volume Up/Down will adjust normally).
(All customer controls are set to nominal level).
Press Recall again to select desired field.
NORMAL
SCREEN
WHITE
SCREEN
RED
SCREEN
GRN.
SCREEN
BLUE
SCREEN
Figure 15. Purity Check Field Mode.
IMPORTANT
Always Exit the Service Mode
Following Adjustments.
Note: Only applicable settings for
the Receiver serviced will be
available.