Quatech Model USBN-500 Network USB2.0 Device Server Over IP 4-Port USB2.
USB Device Server Windows Client User Manual TABLE OF CONTENTS 1. Introduction______________________________________________________________3 2. Windows utility____________________________________________________________3 2.1. Virtual USB-IP Driver Software_________________________________________4 2.2. Device Mapping_______________________________________________________5 2.3. Server Manager_______________________________________________________7 2.4.
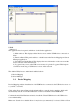
2. Windows utility USBIP Admin utility Setup is an Install Shield based application, which can be used for installing, uninstalling and upgrading this USB device server Client S/W. Please run the self-explanatory Install shield application to install this USB device server Admin Utility. Admin utility application enables the USB devices virtualization along with USB Server Firmware loaded onto this USB device server.
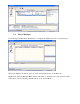
USBIP Admin tool The application has four panels, which are docked in the application. 1) Main window: This displays all the Device server and the USB Devices connected on them 2) Function Panel: This panel enables to switch between the Device Mapping and Server Manager Application. 3) Server/Device Details Panel: This displays the more information of the server and the device selected on the main window. 4) Log panel: Any event on the USB server creates a log in the Log panel.
and the Operating System automatically searches for the driver until the Virtual USB over IP driver is installed. Make sure that you click on “Continue anyway” if a Windows dialog pops up about the Digital Signature as shown below. Power on the USB device server and connect an Ethernet cable from the USB device server Ethernet port to your Local Area Network. The USBIP Windows Admin utility is capable enough to identify the USB device server by it’s IP address on the network.
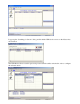
2.3. Server Manager Server manager enables the Administrator to configure the USB device server on the network. The Server Manger also has an option to search for the USB servers on the Network. Right Click on Server Manager Main window and Click on “Search server” as shown below. The same can be done by selecting “Search Servers” from “Server Menu”.
It pops up the ‘Searching for Servers’ dialog and list all the USB device servers on the Network as shown below The USB Device Server search is password protected and should be unlocked in order to configure the selected device.
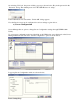
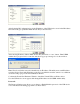
On selecting ‘Un-Lock’ the password dialog pops up as shown below. Key in the password in the ‘Password’ dialog. The default password for the USB IP Server is “usbip” If the Authentication is successful a ‘Unlock OK’ dialog appears. Now the Device server can be configured for various settings as given below. a) Server Configuration Server Manager has an option to change Server Configuration settings through USBIP Admin Utility.
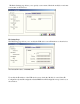
The Basic Settings page allows you to specify a server name .Check the modify box and enter server name as shown below. IP Settings Page: The IP Settings page allows you to modify the USB device server IP Address as shown below. The Default IP Address is 192.168.3.22 To modify the IP Address of the USB device server, check the ‘Modify’ box and Select IP Configuration (Select IP configuration Static/DHCP from IP Configuration drop-down box) as shown below.
After Selecting IP Configuration key in the IP Address of the USB device server in the IP Address field followed by proper Subnet Mask & Gate Way as shown below. After entering IP address, Subnet Mask & Gate Way then click on “save” button. Then USBIP Admin shows progress bar for some time and after it pops up a message box as shown below. Note: Every board in the network is identified by its IP address. The utility treats each IP address as unique device.
Check the Modify box to Enable or Disable password option to the USB device server. b) Upgrade Firmware This USB device server Firmware can be upgraded remotely using the Firmware upgrade option. Select the server on the Server manager. Right Click on the server and Select Upgrade Firmware option to upgrade the firmware. Select the upgrade file by clicking on the Browse option in the “Select File” dialog as shown below. A upgrade.tar.bz2 file is required to upgrade the firmware. The upgrade .
As soon as the transfer is completed, the USB device server automatically restarts to apply the upgraded firmware settings. c) Restore factory defaults Right click on the USB device server under Server Manager Window and select the Restore Factory Defaults function to obtain Default settings as shown below. Then USBIP Admin Utility pops up a window asking for to continue or not. If we select Ok button it will get default settings. 2.4.
the Printer Auto Reconnect button Window. on the Menu bar to open the Printer Auto-Connect Select the Printer which was connected and Click on “Save” and close the Window. Once the Printer is configured for Auto-Connect mode, It remains free as long as the Printer is connected and becomes “Busy” only when a user prints to the printer connected. Multiple User print jobs will be executed on a time sharing basis. 3. USB-IP Web Server It is an administrative web interface for this USB-IP application.
browser, which will displays the default home page of the Server. Default IP address is 192.168.3.22, for USB Server application & the USB device server will have this IP address when USB Server Firmware is loaded on to it. http://192.168.3.22 On password prompt please give ‘admin’ as user name and ‘usbip’ as password. This will bring the home page. If there is no prompt for password please ensure ‘proxy settings’ are disabled in the Windows PC Browser software (Eg. Internet Explorer).
For the wired interface you can configure the Static IP, Subnet Mask, and Gateway manually or set the box to automatically obtain an IP address by setting to the Dynamic (DHCP) mode. 3.4. Status Page The status page displays the current status of the USB devices attached.
a) Thread Status: Thread Session Host Action b) Service Status: Service Status Control c) Device Status: Vendor Id Product Id Class Id Peer-IP address Status This status page is updated automatically every 10 seconds and it shows the device connected to the USB device server. The Device Status table shows the Vendor Id, Product Id, Class, Peer-IP and the Status of the Device connected. The Peer-IP is the IP Address of the computer on which the device is currently accessed.
An upgrade.tar.bz2 file is required to upgrade the firmware.
A file successfully uploaded message is displayed and the webpage also indicates that the USB device server is restarting to apply the upgraded firmware settings.