
Specifications


5.3.7 Save and Exit
This menu item allows you to save all changes and exit from the "Configure
computer" menu. Note that when you exit, the system boots and all changes
take effect immediately.
When you exit from the SCU, all of the SCU changes are written to NVRAM.
All new configuration settings take place upon a soft reboot of the system,
except for video features. If you have changed any video settings (refresh
rate, font size, video type, or mapping), you must put the system through a
hard reboot in order to have the data in NVRAM written to the video chip. If
you change any video features, save and exit from the SCU, remove the SCU
diskette, and then press the reset button on the front panel. Now you can
be sure that the video features you changed have been written to the video
controller.
5.4 Configuring the System with the SCU for ISA Modules
You must install an ISA CFG file for every ISA module in the system. The ISA
CFG file is used to record the settings of the ISA module. The settings must be
accurate because the SCU uses the settings to determine available resources
for autoconfiguration of EISA modules.
5.4.1 Adding an ISA CFG File
1. Boot the SCU.
2. Select "Configure computer."
3. Select "Add or remove boards."
4. With the arrow keys, highlight the backplane slot in which the module is
(will be) installed and press
Enter
.
5. A menu choice is shown. Press
Enter
to see a list of available ISA CFG files
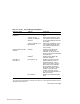
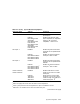
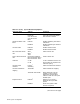
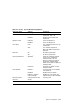
on the system configuration diskette. The ISA CFG files for use with the
three supplied ISA modules are shown in Table 5–3. To view ISA CFG files
on the library diskette, replace the system configuration diskette with the
library diskette and press
Enter
. See Appendix E for a list of the ISA CFG
files on the library diskette.
6. Use the arrow keys to select the desired ISA CFG file and press
Enter
.
5–18 System Configuration