CDMA2000-1X Tracker GL300VC User Manual Application Notes: TRACGL300VCUM001 Revision: 1.00 http://www.queclink.com sales@queclink.
GL300VC User Manual Document Title GL300VC User manual Version 1.00 Date 2014-11-15 Status Release Document Control ID TRACGL300VCUM001 General Notes Queclink offers this information as a service to its customers, to support application and engineering efforts that use the products designed by Queclink. The information provided is based upon requirements specifically provided to Queclink by the customers.
GL300VC User Manual Contents Contents ............................................................................................................................................ 2 0. Revision history ............................................................................................................................ 3 1. Introduction ................................................................................................................................... 4 2. Product Overview .............
GL300VC User Manual 0. Revision history Revision Date Author Description of change 1.
GL300VC User Manual 1. Introduction The water resistant GL300VC is a powerful GPS/GNSS locator designed for lone worker, vehicle, pet and asset tracking applications. The thumb sized button makes this device ideal for applications requiring rapid notification of emergency alert or regular setting of geo-fences based on current location. Its built-in GNSS receiver has superior sensitivity and fast time to first fix.
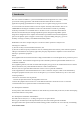
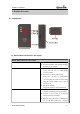
GL300VC User Manual 2. Product Overview 2.1. Appearance 2.2. Buttons/Mini USB Interface Description Button /Mini USB Interface Description Power Key Turn on GL300VC Turn off GL300VC when without charging. (If power key is enabled) Function Key Geo-Fence mode Long press the key to enable/disable Geo-Fence ID0 Geo-Fence in current position mode Long press the key to enable/disable Geo-Fence ID0. If enable Geo-Fence ID0, using the current position as the center of Geo-Fence 0.
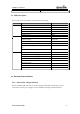
GL300VC User Manual GL300VC 2.3. LEDs Description There are three LED in GL300VC, the description as following. LED CELL LED Searching network State Fast flash GPS LED Network has been registered Power off SIM-PIN Locked Receives a valid protocol command is 2 GPS has fixed Slow flash Dark Solid Turn on for 3 seconds Dark Solid GPS is in fixing Fast flash GPS is on and GPS data wrong Slow flash GPS is off Dark If is 0, 150 seconds later after powers on.
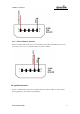
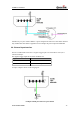
GL300VC User Manual 2.4.2. External Battery Interface The Pin 8 on Mini-USB connector is for external battery and named as EXTBAT pin, It can be connected to 3.7V Li-ion or Li-Polymer battery to power GL300VC. 2.5. Ignition Detection The Pin 7 on Mini-USB connector is for ignition detection when GL300VC is used in vehicle tracking application, It is named as IGN_IND pin.
GL300VC User Manual Another easy way is to connect PIN7 to a power output in the fuse box of the vehicle which is only enabled after the vehicle is ignition on. For example: the power output for radio FM. 2.6. External Input Interface The Pin 5 on Mini-USB connector is a negative trigger input in newer hardware version, It is named as NSW pin. For negative trigger input the electrical conditions are: Logical State Active Inactive Electrical State 0V to 0.8V 1.
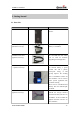
GL300VC User Manual 3. Getting Started 3.1. Parts List Name Picture Remark GL300VC Locater The CDMA-1X/GPRS/GPS locator. AC-DC Power Adapter (Standard accessory) It is used to charge the internal battery of GL300VC. GL300VC Data Cable (Optional accessory) It is the USB data cable which can be used for firmware upgrading and configuration. External Battery Kit (Optional accessory) It is a set of accessories include an external battery, a power control unit and a pelican waterproof casing,.
GL300VC User Manual 3.2. Battery Charging Please connect AC-DC power adapter with GL300VC. Insert the AC-DC power adapter into the power socket. During charging, the PWR LED is flashing fast. When the battery is full charged, the PWR LED will be Ever-light. You can also charge the battery by USB cable which connects GL300VC with the PC. Charging time is about 5 hours. Note: Before the first time using GL300VC, please full charge the battery. 3.3.
GL300VC User Manual 3.4. Turn on/Turn off Turn on: Method 1: Press the Power key at least 3 seconds and release it to turn on GL300VC. At the same time, PWR LED will light on. Method 2: Connect device to charger or external battery, and it will turn on automatically, PWR LED will light on. Turn off: Method 1: Press the power key about 2 seconds; PWR LED will fast flash and then turn off, it indicates that GL300VC is turned off. The time of power off is depended on the quality of network.
GL300VC User Manual 4. Troubleshooting and Safety info 4.1. Troubleshooting Trouble Possible Reason Solution After GL300VC is turned on, the CDMA-1X LED flashes quickly always. The signal is too weak; GL300VC can’t register to the network. Please move GL300VC into place with good CDMA-1X coverage. Messages can’t be reported to the backend server by GPRS. APN is wrong. Some APN cannot visit the internet directly. Ask the network operator for the right APN.