
Installation Instructions


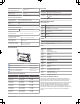


GTB 10 black box device
GTB 10 black box power cable
GTB 10 IN/OUT cable, corresponding relay wire
Optional switch. Must be turned on for remote operation
Relay (one 12 V relay included)
Power source
Device controlled by the relay, such as a light
Negative control wire, white
Positive control wire, black
Negative load wire, blue
Positive load wire, yellow
Connecting the Ignition Wake Input
The Ignition Wake input enables the device to stay on when the boat's
electronics are turned on.
If you need to extend the IN/OUT wires, use minimum of 24 AWG (0.08 mm
2
)
wire.
NOTE: You must connect this input to use the device for the vessel Wi‑Fi
®
network and to update the software from a connected Garmin chartplotter.
1
Connect the white/violet wire from the IN/OUT wiring harness to a 1 Amp
fuse and the positive side of the boat's 10 to 32 Vdc accessories or ignition
output, or power indicator.
2
Connect the black wire (Ground) from the IN/OUT wiring harness to the
negative side of the boat's accessories or ignition output, or power
indicator.
NOTE: If the boat's ground is ever intended to be switched off from the
power source, do not directly connect the Ground (black) wire from the
IN/OUT wiring harness to the negative side of the of the GTB 10 black box
device's power source.
Connecting the Battery Inputs
If you need to extend the IN/OUT wires, use minimum of 24 AWG (0.08 mm
2
)
wire.
1
Connect the Battery 1 Pos (red) or Battery 2 Pos (yellow) wire from the
IN/OUT wiring harness to a 1 Amp fuse and the positive side of the boat's
10 to 32 Vdc battery.
2
Connect the corresponding Battery 1 Neg (green) or Battery 2 Neg
(orange) wire from the IN/OUT wiring harness to the negative side of the
boat's battery.
To monitor the 10 to 32 Vdc power input to the GTB 10 black box device, you
must also connect it to one set of the Battery 1 or Battery 2 inputs.
Connecting the Bilge Pump Inputs
If you need to extend the IN/OUT wires, use minimum of 24 AWG (0.08 mm
2
)
wire.
1
Connect the Bilge 1 (white/black) or Bilge 2 (red/white) wire from the
IN/OUT wiring harness to a 1 Amp fuse and the switched positive side of
the bilge pump's 10 to 32 Vdc power source.
NOTE: If you are connecting to an auto-sensing bilge pump with an
optional manual connection, you may be able to connect this input to the
pump's manual connection if it is energized to 10 to 32 Vdc when the pump
is active.
2
Connect the negative side of the bilge pump's power to the negative side of
the power source for the GTB 10 black box device's power source.
NOTE: If the boat's ground is ever intended to be switched off from the
power source, do not directly connect the Ground (black) wire from the
IN/OUT wiring harness to the negative side of the of the GTB 10 black box
device's power source.
Garmin Marine Network Considerations
NOTICE
A Garmin Marine Network PoE Isolation Coupler (010-10580-10) must be
used when connecting any third-party device, such as a FLIR
®
camera, to a
Garmin Marine Network. Connecting a Power over Ethernet (PoE) device
directly to a Garmin Marine Network chartplotter damages the Garmin
chartplotter and may damage the PoE device. Connecting any third-party
device directly to a Garmin Marine Network chartplotter will cause abnormal
behavior on the Garmin devices, including the devices not properly turning off
or the software becoming inoperable.
This device can connect to additional Garmin Marine Network devices to share
data and update the software from a connected Garmin chartplotter. When
connecting Garmin Marine Network devices to this device, observe these
considerations.
• You must use a Garmin Marine Network cable for all Garmin Marine
Network connections.
• You should not use third-party CAT5 cable and RJ45 connectors for
Garmin Marine Network connections.
• You can purchase additional Garmin Marine Network cables and
connectors from your Garmin dealer or garmin.com.
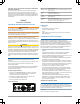
Garmin Marine Network Connection Diagram with Relay
NOTICE
To avoid potential damage to the relay switch, GTB 10 black box device, and
device being switched, you must install this relay switch in a dry location.
This relay is automatically controlled by the GTB 10 black box device to switch
power to Garmin Marine Network devices.
GTB 10 black box device
GTB 10 black box power cable
GTB 10 IN/OUT cable, Relay 6 (Aux), white/brown wire
Installation Instructions 5