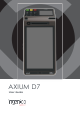
AXIUM D7 User Guide
Contents 1_Introduction 4 2_Presentation 5 2_1 Content of the box 5 2_2 Overview of the AXIUM D7 7 3_Prepare your terminal 8 3_1 Connect the battery 8 3_2 Install SIM & MicroSD 9 3_3 Install SAM 11 3_4 Switch On/Off the terminal 4_Charge your terminal 4_1 Battery characteristics 12 4_2 Charge of the battery 13 4_3 Changing the battery 14 5_Use of your terminal 16 5_1 Keyboard on payment side 16 5_2 Touch panel on payment side 16 5_3 Reading card 17 5_4 FCC/IC Compliance 18 6
7_Docking station 21 8_Recommendations 22 8_1 Safety 22 8_2 Security of your terminal 23 9_Standards 25 10_Troubleshooting 26 11_Marking 27 AXIUM D7 3 Copyright© 2019 Ingenico All rights reserved 900034667 R11 000 04/0119
1_Introduction We hope that you will be fully satisfied with your new terminal AXIUM D7. Read this guide to understand and make the best use of your terminal. It presents you the necessary information about use, installation, maintenance, safety and security recommendations. WARRANTY / SECURITY Use only the power supply included with the product to ensure best performance and safety. Maintenance should only be provided by Ingenico authorized technician.
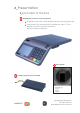
2_Presentation 2_1 Content of the box AXIUM D7 terminal unit equipment Payment side with small display and physical keyboard Merchant side (AndroidTM User Interface) with a 7 inch display and touch panel interface. Android is a trademark of Google LLC.
Power supply and USB-C cable WARNING The power supply unit provided with your equipment is specially designed for Ingenico terminals. Do not use any other power supply. The use of a power supply with apparently similar voltage/current characteristics may damage your terminal. ADVICE Keep the packaging. It must be re-used whenever the terminal is shipped.
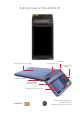
2_2 Overview of the AXIUM D7 Front camera 7inch Display with Touch Panel Smart Card Reader Keyboard with backlight Magnetic Card Reader Contactless Reader around the display 2.
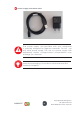
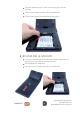
Weight Terminal (+ Battery) : 520gr Dimensions (L x w x h) Terminal : 263,2 x 117,4 x 15,7 mm3 Electrical main network 100-240VAC / 50-60 Hz - Class VI equipment Connections on terminal USB-C connector + rear contacts for connexion with docking station 3_Prepare your terminal 3_1 Connect the battery Turn your terminal and unclip the battery trapdoor by pushing on it as shown on the picture Disengage the trapdoor Take the battery pack included in the box Locate the battery pack connector beside the b
Plug the battery pack to the connector as shown on picture. Place the battery pack in its compartment. Close the battery compartment trapdoor.
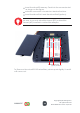
Insert the MicroSD Memory Card into the connector slot as shown on the figure. MicroSD connector is located on terminal bottom. Insert the Micro SIM 1 and the Micro SIM2 (option). ADVICE be sure to use only MicroSIM format (3FF) or NanoSIM format (4FF) inserted in a MicroSIM adaptor SIM1 SIM2 MicroSD (option) connector To Remove the microSD OR MicroSIMs, please push slightly it and it will come out.
3_3 Install SAM CAUTION Switch off the terminal before opening the trapdoor. Turn the terminal and unclip the trapdoor by pushing on the clip as shown with the arrow on the picture. The connector modules security SAM are located inside the terminal, in a closed compartment.
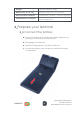
3_4 Switching On/ Off the terminal ON/OFF Key If the battery is empty and the terminal in use is removed from its base, the terminal automatically shuts down. It may also be switched off by pressing the ON/OFF key, few seconds until it appears the message “SWITCH OFF” on merchant side. In order to restart the terminal, press the ON/OFF key. 4_Charge your terminal 4_1 Battery characteristics Characteristics Li-Ion Polymer Capacity 4000mAh Charging voltage 4.2V Charging Current (Max) 1.
4_2 Charge of the battery WARNING Check that the terminal is not connected to the main electric network. When does the battery need to be charged? Upon initial start up, charge the battery for 16 hours under the environmental conditions stated above When used daily, the terminal recharges its battery each time it is connected to its external power supply unit or each time it is placed on its docking station.
4_3 Change of the battery It is imperative to use a battery authorized by Ingenico. There is danger of explosion if battery used is not approved by Ingenico. Remove the terminal from its base Turn it off by pressing the ON/OFF Key Remove the battery battery”) trapdoor (see section 3.1“installing Carefully disconnect battery, following the instructions below. Connect and install the new battery by following the instructions in section 3.
Risk of explosion if battery is replaced by an incorrect type, do not disassemble, use specified charger only, do not short-circuit, do not dispose of in fire, do not throw in water, dispose of used batteries according to the instructions.
5_Use of the terminal 5_1 Keyboard on consumer side Some keys can have other functions according to the applications that are in the terminal. Axium D7 keyboard is composed of 15 physical keys. The red key cancels the procedure in progress The green key validates input selections and informations The yellow key cancels the last characters 5_2 Touch panel on consumer side The AXIUM D7 device is equipped with touch panel allowing to capture functions and menus using your finger or a stylus.
5_3 Reading card Magnetic stripe card The card can be read either from bottom to top or from top to bottom, with the stripe facing down. Use a regular movement in order to ensure a reliable card reading. Smart Card reader Insert the card vertically with the chip facing the customer and leave in position throughout the transaction.
Contactless Bring the card firmly up to the active zone. Keep the card close to the reader during the transaction. The 4 LEDs are displayed on top of customer display during the transaction. 5_4 FCC/IC Compliance You are cautioned that changes or modifications not expressly approved by the part responsible for compliance could void the user’s authority to operate the equipment.
standard(s). Operation is subject to the following two conditions: (1) this device may not cause interference, and (2) this device must accept any interference, including interference that may cause undesired operation of the device. Le présent appareil est conforme aux CNR d’Industrie Canada applicables aux appareils radio exempts de licence.
In all those configurations, the antennas are far (several decades of centimetres) from the Human body (Merchant or Customer side) This POS does not support or cannot support body worn accessories like belt clips etc, its weight (~535gr) and its height (265 x 120 mm) do not allow to wear it easily in a holster or in a shirt. Hand held SAR evaluation for "extremity SAR test ONLY" has been applied.
6_Installation / Recommendations Location of the AXIUM D7 Place the terminal on flat surface near an electric socket. The terminal should be placed far from any very hot zones, protected from vibrations, dust, damp and electromagnetic radiation (computer screen, anti-theft barrier etc.).
7_Docking station AXIUM / series offers a base station providing different features to ease your life : Charging (please refer to 4.2) 3 USB Ports Printing capability Ethernet and Wifi (option) AXIUM D7 can be charged with a dedicated Ingenico docking Station. On the back of the product there are some contacts for charging when the device is put on the docking station.
8_Recommendations 8_1 Safety Powering down the AXIUM D7 Disconnect the AXIUM D7 power supply block adapter from the electrical mains network. Lithium cell The AXIUM D7 is fitted with an internal lithium cell which can only be accessed by a qualified technician. Battery AXIUM D7 is fitted with battery specially designed for this terminal. Only use the appropriate chargers and batteries listed in the Ingenico’s catalogue. Do not short-circuit the battery. Do not attempt to open the battery container.
On airplanes Your handset must be switched off by removing the battery pack. Remove the battery from the terminal when on an airplane. Non-compliance with these safety rules may result in legal action and/or a ban on later access to cellular network services. Explosion areas Certain regulations restrict the use of radio equipment in chemical plants, fuel depots and any site where blasting is carried out. You are urged to comply with these regulations.
CAUTION Positioning of the AXIUM D7 on check stand must be in such a way to make cardholder PIN (Personal Identification Number) spying infeasible. Installing device on an adjustable stand must be in such a way that consumers can swivel the terminal sideways and/or tilt it forwards/backwards to a position that makes visual observation of the PIN-entry process difficult. Positioning of in-store security cameras such that the PIN-entry keypad is not visible. NEVER ask the customer to divulge their PIN Code.
9_Standards The CE marking indicates AXIUM D7 complies with the relevant Union harmonization legislation: RE Directive 2014/53/ EU for : the protection of the health and the safety of the user and any other person. the protection requirements with respect to electromagnetic compatibility. and complies with harmonised standards.
10_Troubleshooting The terminal does not turn on Check the battery (is it discharged ?, is it connected ?) A full discharged battery can take long charging time to recover Put terminal on powered base Get technical support Cards are not read Check that the magnetic card is swiped correctly (with magnetic band on terminal side).
11_Marking The CE marking indicates terminal complies with harmonized standards and requirements of European Directives. This marking indicates that the product operates with an alternating current (AC) source (mains). It is completed by afferent values (voltage, frequency and max current). This marking indicates that your terminal is suitable for direct current (DC) only. It is completed by afferent values (voltage, and max current).
“This Document is Copyright © 2019 by INGENICO Group. INGENICO retains full copyright ownership, rights and protection in all material contained in this document. The recipient can receive this document on the condition that he will keep the document confidential and will not use its contents in any form or by any means, except as agreed beforehand, without the prior written permission of INGENICO.