
User manual
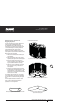


HPi110 & HPi210
Quick Rig (QR) Systems
User Manual
HPi110 & HPi210 Quick Rig (QR) Systems
23
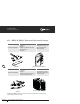
Mounting the Speaker & Rigging System
Mounting the QR-UB bracket
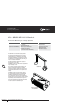
Configuring the Horn Flare Wave Guide for Horizontal Installation
The HPi110 is equipped with a rotatable asymmetric horn flare which can be used in harmony
with the QR-UB bracket to ensure that acoustic dispersion is accurately configured to suit the
requirement of the installation.
For more details, consult the HPi 110 owner’s manual to set the horn flare dispersion to the
horizontal with the desired horn coverage dispersion.
Remove the front grill and unfasten the four screws holding the horn flare. The section of the horn
flare with the “Q” is the wide dispersion side and the narrow area of the horn is the long throw and
must be set to the ceiling side of the installation (if that is the area required for the HF long throw)
When reattaching the horn flare, do not over tighten the screws.
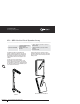
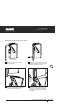
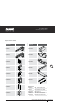
Remove the
top hat from
the HPi110
as well as the
2 screws at
the top of the
speaker.
1
Replace the
top hat plate
with the HPi110
bracket Bottom
plate.
2
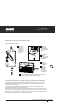
Screw in with
3 of the 4
screws you just
unscrewed from
the cabinet
3
Insert the
bracket over
the speaker
4
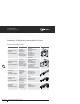
Bolt it on
the bottom
plate (use
a long M6
screw in the
packaging)
5
Choose your angle by placing the top screws (included in the
kit) in the right holes through the rotation plate.
6