
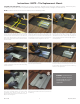
Brochure


BI 7.2.3-40 Sep-2016, Rev 5
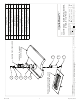
Locate and remove the tile that will be replaced by
the tile replacement flashing. Remove tile to the le
of and above the mount location. Locate ra er and
mark center. Measure 8" up from bottom of the
adjacent tiles and mark the location with a horizontal
line across ra er.
2
3
1
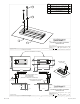
Align the base plate over ra er so the lag holes line
up with the ra er line and horizontal line aligns with
the post groove. The orientation of the base plate can
be flipped east-west for post location versatility of up
to 12". Mark location of lag holes on the roof.
Drill two pilot holes using " bit to a depth of 2".
Be sure lags go into center of ra er for strongest
attachment. Pilot holes reduce ra er splitting. Fill
pilot holes with appropriate sealant and align lag holes
over the pilot holes.
Waterproof at underlayment level according to
roofing manufacturer instructions and Tile Roofing
Institute Guidelines.
6
7
4
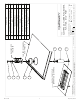
Insert the grade-8 serrated flange bolt into the bottom
of the post. Slide post into base plate channel. Line
up post with the hole in the tile replacement flashing.
Leave loose for adjustments.
Place the tile replacement flashing over the post
and mount, allowing flashing to interlock with
surrounding tiles properly. Secure the post by
tightening it down using a pair of channel lock pliers.
Replace surrounding tiles.
5
Use T-30 Torx bit and impact gun to secure mount into
ra er with provided hardware.
Instructions: QMTR - Tile Replacement Mount
Installation Tools Required: stud finder, tape measure, utility knife, drill with " bit, impact gun with T-30 Torx bit, channel lock pliers,
caulking gun, appropriate sealant compatible with EPDM rubber and roofing materials, roofing bar, and hand broom.
NOTE: Installation method is the same for all tile replacement flashing profiles.
1
WARNING: Quick Mount PV
products are NOT designed
and should NOT be used for
anchoring fall protection
equipment.
8
Apply a bead of sealant where the post meets the
flashing. Slip the EPDM collar over the post and onto
the flashing.