Installing Quick Mount PV Products on Metal Shingle Roofs RESPECT THE ROOF
Getting Started Steel Shingle Roofing Flashing Method and Product Type Terminology QBase Mount Flashing Interlocking Steel Shingle Interlocking Shingles with Sandwich Flashing Method Underpan QBase Mount Flashing Interlocking Steel Shingle Interlocking Shingles with Underpan Flashing Method QBase Mount Flashing Non-Interlocking Steel Shingle Non-Interlocking Shingles with Sandwich Flashing Method Underpan QBase Mount Flashing Non-Interlocking Steel Shingle Non-Interlocking Shingles with Underpan Fla
Selecting the Proper Quick Mount PV Product & Post Height Selecting the proper mount to use with a particular shingle type is straightforward.
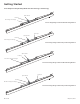
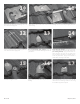
Installation Instructions for Sandwich Method Flashing on Interlocking and Non-Interlocking Steel Shingle Roofs Includes: Decra Tile, Decra Villa Tile, Decra Shake, Decra Shake XD, Decra Shingle XD, Gerard Pacific Tile, Gerard Canyon Shake Tile, Gerard Granite Ridge Shingle, Gerard Barrel Vault, and others 1 Mark the center of the rafter / structural member at the mounts location on the roofing panel. 4 Drill (2) 7/32" pilot holes into the center of the rafter.
10 Mold the dead soft aluminum flashing cone to fit the contours of roofing panel. 12 11 Mark off the location of the center of the mount and flashing cone on a secondary 1/2 length panel of the same roofing. 13 14 trimmed edge Cut an opening around the cone flashing and down to the bottom of the 1/2 length panel. 15 Screw all roofing panels down. BI 7.2.3-42 For non-interlocking type shingles, insert the cut 1/2 length panel over the flashing and under the panel above.
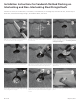
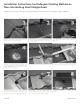
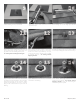
Installation Instructions for Underpan Flashing Method on Non-Interlocking Steel Shingle Roofs Includes: Decra Tile, Decra Villa Tile, Gerard Granite Ridge, Gerard Pacific Tile, Gerard Barrel Vault, and others 1 Remove screws from metal shingle panel and remove the panel at the mount location. 2 Mark the center of the rafter, layout the mount within the shingle coursing, drill (2) 7/32" pilot holes into the center of the rafter. 6 Mark a circle and cut out with aviation tin snips.
9 Mold the dead soft aluminum flashing cone to fit the contours of the underpan. 11 Mark a circle and cut out with aviation tin snips. The hole should be large enough to leave about a ½" gap between the cone flashing and the panel. See Getting Started: Cutting Steel Shingles. 14 Slip the EPDM rubber collar over the post and slide collar down to the flashing. BI 7.2.3-42 10 Mark off the location of the center of the mount and the flashing cone on the panel that was removed in step 2.
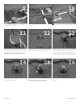
Installation Instructions for Underpan Flashing Method on Interlocking Steel Shingle Roofs Includes: Decra Shake, Decra Shake XD, Decra Shingle XD, Gerard Canyon Shake Tile, Gerard Granite Ridge, and others 1 Remove the panels at the mount location to the course below your lowest mount. For new construction, install roofing panels up to the course below your lowest mount. Locate the rafter on the roof.
Slide the flashing over the post/standoff. 11 Mark a circle and cut out with aviation tin snips. The hole should be large enough to leave about a ½" gap between the cone flashing and the panel. See Getting Started: Cutting Steel Shingles. 14 Apply a heavy bead of sealant to the area between the shingle panel and the flashing. Smooth sealant without removing large amount of sealant. Sealant should maintain thickness as much as possible. Apply a bead of sealant where the post meets the flashing. BI 7.2.
RESPECT THE ROOF 925-478-8269 | www.quickmountpv.com | info@quickmountpv.com 2700 Mitchell Dr. | Walnut Creek, CA 94598 BI 7.2.3-42 May-2017, Rev 1 ©2017 by Quick Mount PV. All rights reserved.