
Installation Guide

ALL TILE ROOF HOOKS
INSTALLATION INSTRUCTIONS
RECOMMENDED MATERIALS
•Rafter locater
•Chalk or crayon
•3/16” Drill Bit
•Sealant
•Grinder (tiles may have to be notched before placing back on roof)
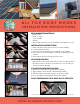
INSTALLATION INSTRUCTIONS
1. Remove the tiles from the area in which you will be installing.
2. Locate and mark the rafters.
3. Place the Hook and predrill two holes with the 3/16” Drill Bit.
4. Remove the Hook, clear the debris, and fill the predrilled holes with
sealant.
5. Place and mount the Hook using the Solar Screws.
ADJUSTABLE HOOKS
•Adjust the Hook as need be either before or after mounting the Hook.
•The ideal location for the Hook on Curved Tiles is over the valley of
the tile to minimize drainage.
IF USING ALUMINUM FLASHING
6. Make a cut in the paper to fit the Aluminum Flashing.
7. Apply sealant to the underside of the Aluminum Flashing.
8. Slide the Flashing undeneath the paper or nail down edges.
9. Cover the edges of the Aluminum Flashing with Sealant.
PLACE THE REMOVED TILES BACK ON TO THE ROOF
1
2
3
4
5
INSTALLATION VIDEOS, SPEC SHEETS, & TEST RESULTS AVAILABLE ON
WWW.SOLARROOFHOOK.COM
The maximum torque value on the 5/16-18 or M8 Stainless Steel Hex Bolt (adjustment bolt) is 132 in-lbs.