
Owner`s manual
122143 Rev. D
16
QRI
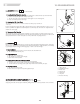
L. CUSHION INSTALLATION
(Option)
Place cushion on seat sling with VELCRO® side down. The beveled edge of the cushion should be in front. Press
firmly into place.
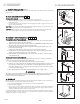
M. BACK ANGLE ADJUSTMENT
Adjusting the Back Angle
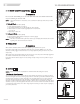
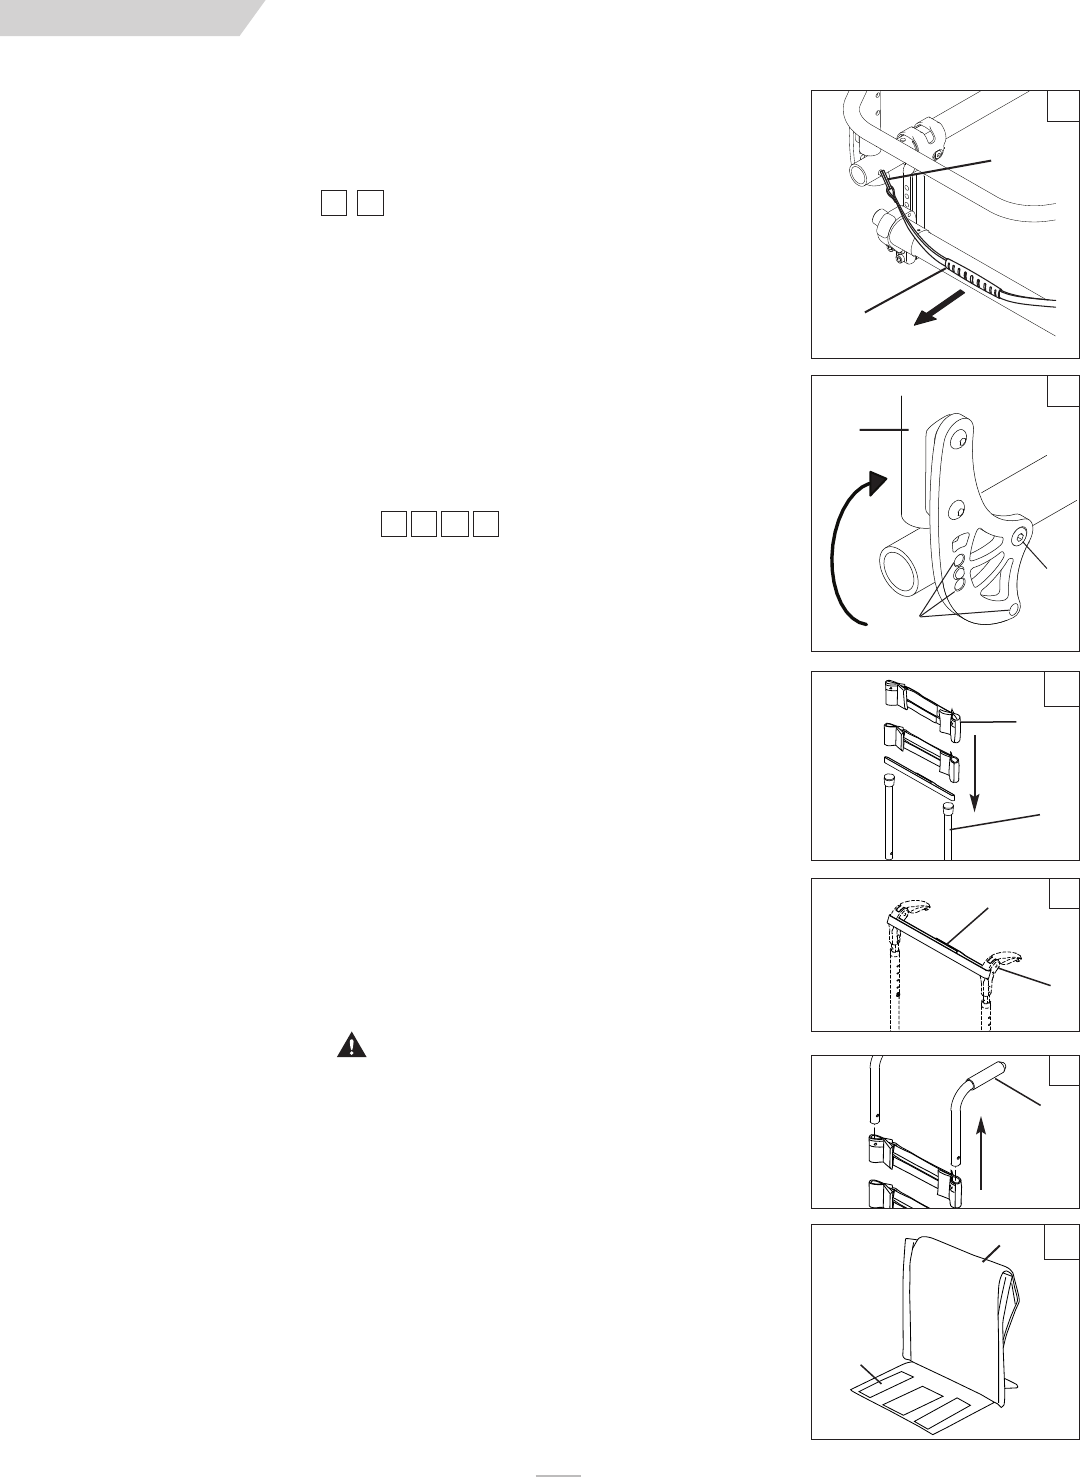
1. Release the backrest by pulling the release cord (A) with a simple, short force.
2. While maintaining tension on the release cord, rotate the backrest (D) to the desired angle or to the
folded down position.
3. Lock the backrest in place by releasing the cord and allowing the pins (B) to engage in the nearest hole
(E) of the backrest bracket (C).
CAUTION–
Be sure the pins (B) are fully engaged through the backrest bracket (C) on both sides of the chair.
Test the backrest to be sure it is locked before use.
CAUTION –
When changing the back angle of the wheelchair both the left and right angle adjustable back
bracket must be in the same hole position before the wheelchair is to be used.
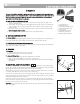
N. BACKREST TENSION ADJUSTABLE
To install the Backrest Tension Adjustable
1. Slide Velcro straps (F) over the backrest frame (G)section. Make sure to include at least one
strap below the towel bar (if using a rigid chair).
2. Tighten the straps appropriately to desired tension level. DO NOT overtighten straps as this
will cause undue strain upon the chair backrest frame (G).
3. If using fold down push handles, insert the single Velcro strap (H) through the slots in the
front of the push handles (J).
If using inegral push handles (I), slide straps from bottom of backrest upward.
4. Install backrest cover at desired level and fold over rear of Velcro strapping system (K). The
Quickie patch should be upright on the rear of the chair.
5. Finish installation by placing vanity flap (center panel) down onto Velcro on the seat sling to
secure attachment (L).
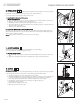
Adjusting the Backrest Tension Adjustable
Suggest using anti tips while making any adjustments. Ensure anti tips are safely secured and in a
position to prevent the wheelchair from tipping backwards.
1. User can transfer into wheelchair. Place wheel locks in the locked position
2. From the rear of the wheelchair the attendant can lift the Vanity Flap (Center panel) to access
the strap system. Adjust straps for optimal balance and truck alignment. Ensure the Velcro
straps has a minimum of 2”s of engagement, hook securing to loop. Press the Velcro together
to ensure it’s securely engaged.
3. Once adjustments have been finalized replaced Vanity Flap to its original position.
WARNING
Any changes made to the straps will affect the center of gravity. Suggest the user has the attendant
stationed behind the wheelchair to prevent the wheelchair from tipping backwards while they
become accustomed to the adjustment.
O. CHECK-OUT
After the wheelchair is assembled and adjusted, it should roll smoothly and easily. All accessories should also per-
form smoothly. If you have any problems, follow these procedures:
a. Review assembly and adjustment sections to make sure chair was properly prepared.
b. Review trouble shooting guide.
c. If your problem persists, contact your authorized supplier. If you still have a problem after contacting your
authorized supplier, contact Sunrise customer service. See the introduction page for details on how to
contact your authorized supplier or Sunrise customer service.
You will need to adjust your chair from time to time for best performance (especially if you alter the original
settings). This chart gives you a first solution, then a second and a third if needed. You may need to look farther
to find the best solution for a specific problem.
2019
21 22 23 24
19
A
B
C
E
D
20
VIII. USE AND MAINTENANCE
22
H
I
23
J
21
F
G
24
K
L