
Installation Guide

2
Instruction Manual for Installing Furniture Barn Door Hardware
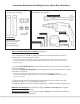
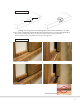
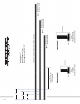
Step 1: Installing the Straps on the Door (see figure 1)
1. For a single door installation, center the strap on the stile of the door or space it a
minimum of ⅝” from the edge of the door.
Note: For a biparting door application using the supplied adjustable door stops in the middle, there must
be a minimum of a ⅝” gap between the edge of the door and the edge of the strap for the doors to close
together properly.
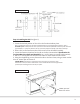
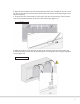
2. Locate the top fastening hole by measuring from the top of the door down 1”. Mark the
location on the door.
3. Locate the bottom fastening hole by measuring from the top of the door down 3”. Mark
the location on the door.
Note: when using the optional anti-jump discs, part number NT.1318.08, the fastening hole
measurements will be ⅞” and 2 ⅞” respectively. The anti-jump discs CANNOT be used with the optional
soft-close mechanism.
4. Place the strap on the door and align the holes with the center marks on the door.
5. Using a #5 Vix bit or a ⁄” drill bit, drill a pilot hole.
6. Fasten the straps to the door with the supplied #6 x ¾” Phillips-drive pan-head screws.
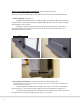
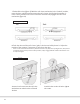
Maximum door thickness = 1 ⅛” (when using the standard 1” standoff that is supplied
with each rail kit, NT.1302 series)
Maximum door thickness = 1 ½” (when using the optional 1 5/16” standoff, part number
NT.1303-34mm.08, sold separately)
Shown: QG.1410.01.08
Comes with:
Two (2) Hook Carriers
Two (2) Door Stops
Four (4) Screws
2mm Allen Wrench
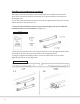
Installation Tools Needed: