
Installation Guide


3
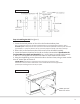
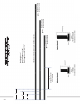
Step 2: Installing the Rail (see figure 2)
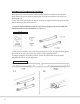
1. Locate the desired position of the rail on the furniture/cabinet piece.
Note: In applications where the rail will be installed beneath an overhanging table/countertop, allow a
minimum of 2 ½” – 2 ¾” from the center of the rail to the underside of the table/countertop. This will create
approximately ¼” of clearance between the top of the strap and the underside of the table/countertop.
2. Draw a line on the face frame where the center of the rail will be installed.
3. Locate the fastener locations for the rail on the line (see attached “Specification for
Furniture Barn Door Rails and Standoffs” on p. 10 for center-to-center hole locations).
4. Drill a ⁄” (4mm) pilot hole into the face frame for each fastener hole location.
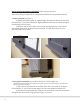
5. Using the supplied lag screws, fasten the rails to the face frame, using a 10mm socket
drive or 10mm open end wrench.
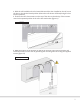
SPECIAL NOTE: In biparting door applications where doorstops are used in the center
between the 2 doors, be sure to mount these on the rail and slide them into the approximate
position before installing the rail onto the face frame.
⅝”
stops
Top of door to
center of hole
Figure 2
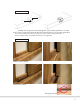
Figure 1
10mm open end
wrench or socket