
Installation Guide


3
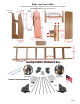
Step 1: Rail Installation
Special application notes:
� Leave at least 7” of clearance between the center of the rail and the ceiling, crown
moulding or other overhanging protrusions when the ladder is in the stored position
(close to the wall/cabinet/bookshelf). In the climbing position, a minimum 3” clearance
between the center of the rail and any upper cabinet doors is required to be able to open
the upper cabinet doors.
� Do not mount rail brackets directly onto a drywall surface. Always mount these brackets
to solid wood, predrilling the holes in the wood is advisable to avoid splitting the wood.
1. Establish the height of where the center of the rail is to be installed and mark the location
where the bottom of the mounting bracket will be located (depending on which type of
bracket is used, the distance between the center of the rail and the bottom of the bracket
will change, see dimensional specs on the bracket those measurements). Verify with a
quality leveling device that the lateral locations of the brackets are level and true.
2. To splice rails together using the Quiet Glide splice kit (QG.41) complete the following
steps:
� Insert the roll pin halfway the length of the pin into one of the rails
� Slide the steel bar halfway into the rail and tighten 2 of the set screws to lock the
bar and roll pin onto the rail.
� Line up the roll pin hole and slot for the steel bar on the other rail and slide the
rail over the pin and bar till a tight connection is made between rails.
� Complete the splice by tightening the remaining 2 set screws
3. Slide all the brackets to be used onto the rail, recommended spacing of the brackets is
approximately 32” apart.
4. Secure each bracket to the wood surface with the screws included.
Step 2: Ladder Assembly (if applicable)
(It is recommended that the ladder rail sides and steps are sanded slightly with a 220 grit sand
paper just prior to applying the finish (stain, paint, clear coat sealer) on the ladder. It is also
much easier to finish the ladder prior to assembly, taking care to protect the inside of the dados
of the side rails and the ends of the steps from the applied finish that would prevent a good
strong glue bond between the steps and the side rails)
1. Stand on edge one of the ladder side rails on a flat surface, dados facing away from you.
2. Insert one of the steps into the dado, aligning the compound miter of the step flush with
the dadoed surface of the side rail. If not flush, flip and/or rotate the step until it lines up
properly with the side rail.
3. Once proper alignment of the step is established, apply a thin film of quality
woodworker’s glue to the end of the step and also in the dado.
4. Using the supplied 1-3/4” washer-head screws, secure the step to the side rail through the
predrilled holes on the side rails. Assemble the remaining steps in the same manner.
General InstallatIon/specIfIcatIon GuIde