
Instructions / Assembly

QUIETCOOLSYSTEMS.COM 7
Figure 2.1G
Figure 2.1H
9. Slide the fan unit underneath the shingles until the fan
reaches the top of the hole and apply more sealant.
(See Figure 2.1F)
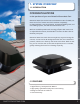
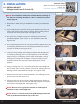
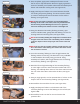
10. Using a minimum of 8 roong fasteners, fasten the fan
to the roof through the primary ashing, securing the
fan to the roof. One (1) fastener is required at each
corner. One (1) fastener is required at the midpoint
of each side. The fasteners must be long enough to
penetrate the primary ashing and completely through
the roof decking. To prevent leaking, be sure to apply
weatherproof sealant on the fasteners. (see Figure
2.1G)
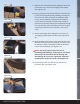
11. Secure the shingles by re-nailing them into the roof
and applying weatherproof sealant. (See Figure 2.1H
& I)
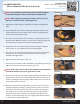
12. Apply weatherproof sealant to the seam between the
AFR fan housing and primary ashing. This seam must
be sealed to create a weatherproof barrier between
the fan and the ashing. (see Figure 2.1J)
NOTE: This seam exists to allow the use of
interchangeable ashings. If this seam is not sealed,
water may leak in between the fan housing and
the ashing. Be sure to use a generous amount of
weatherproof sealant to create a watertight seal.
13. Re-install the hood onto the fan unit and remove
protective lm. (see Figure 2.1K)
Figure 2.1I
Figure 2.1K
Figure 2.1J
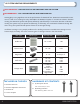
WELCOME
INSTALLATION
WIRING OPERATION
WARRANTY
!!