
Instructions / Assembly

QUIETCOOLSYSTEMS.COM 9
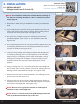
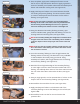
11. Once complete, apply more weatherproof barrier around
the fan unit on top and bottom. Be sure to apply a generous
amount of weather proof sealant underneath the weatherproof
barrier and install with roong nails. (see Figure 2.2F)
12. Apply weatherproof sealant to the seam between the AFR
fan housing and primary ashing. This seam must be sealed
to create a weatherproof barrier between the fan and the
ashing. (see Figure 2.2G)
NOTE: This seam exists to allow the use of interchangeable
ashings. If this seam is not sealed, water may leak in between
the fan housing and the ashing. Be sure to use a generous
amount of weatherproof sealant to create a watertight seal.
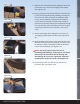
13. Using the QuietCool Secondary Flashing accessory (part
number FLA-SEC-3743), gently slide the ashing over the fan
housing and hood mounting tabs. (see Figure 2.2H)
NOTE: The secondary ashing was designed to work with almost
all types of tile and cement roofs. The ashing can be molded to
create the shapes of more unique style roofs such as S-Tile and
M-Tile.
NOTE: Be sure that the secondary ashing extends onto the roof
tile at the bottom of the ashing. This ensures that water cannot
leak in between roof tiles.
15. Form the secondary ashing to close the gap between the
ashing and the fan housing. The aluminum is very malleable
so this should be done easily using your hands. Using
weatherproof sealant, seal the gap between the fan housing
and secondary ashing. (see Figure 2.2I)
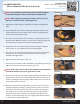
16. Bend the left and right side edge of the secondary ashing
at a 90º angle to create a water channel on either side of the
ashing. This will help direct water to ow down and back onto
the roof rather than side to side under the tiles. (see Figure
2.2J)
17. Using an angle grinder, cut the removed tiles to t them to the
shape of the fan and secondary ashing. (see Figure 2.2K)
18. Re-install the tile around the fan unit. (see Figure 2.2L)
19. Apply weatherproof sealant on the bottom side of the
secondary ashing to secure the ashing to the roof tile.(see
Figure 2.2M)
20. Re-install the hood onto the fan unit and remove the
protective lm.
WELCOME
INSTALLATION
WIRING OPERATION
WARRANTY
!!
!!
!!
Figure 2.2G
Figure 2.2H
Figure 2.2I
Figure 2.2J
Figure 2.2K
Figure 2.2L
Figure 2.2M