ADVANCED WHOLE HOUSE FANS ® THE NATURAL CHOICE FOR ENERGY SAVINGS! INSTALLATION GUIDE SPECIALTY SERIES FANS DO NOT THROW AWAY! SERIAL NUMBER FOR FAN IS LOCATED ON BACK COVER OF OWNER’S GUIDE. RETAIN IN A SAFE PLACE.
GENERAL SAFETY INSTRUCTIONS 1. 2. 3. 4. 5. 6. 7. Read Instructions - All safety and operation instructions must be read. Failure to read and follow instructions as stated in this guide may void applicable warranty. Retain Instructions - The safety and operating instructions should be kept for future reference. Heed Warnings - All warnings should be followed. Follow Instructions - All installation and operating instructions should be followed.
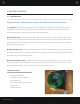
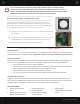
1. SYSTEM OVERVIEW 1.1 INTRODUCTION Congratulations on the purchase of your new QuietCool Specialty Series Fan! The QuietCool Specialty Series was designed for every application imaginable. QuietCool Specialty Series fans dominate the market in energy efficiency. Our Specialty Series works great in practically all climate zones and most homes, mobile homes, and even warehouse buildings! QuietCool Attic Fans: The QuietCool Attic Fans are the best in the business.
1.4 System Venting Requirements VERY IMPORTANT! - 1 SQUARE FOOT OF NET FREE VENT AREA PER 750 CFM RECOMMENDED! - 2 TO 4 SQUARE FEET OF INLET VENTS PER FAN Venting plays a very significant role in the performace of QuietCool fans. QuietCool recommends a minimum of 1 SQ. FT. of venting for every 750 CFM in the QuietCool system. If an attic has at least 1:750 attic venting, the QuietCool system will operate efficiently and effectively.
2. INSTALLATION 2.1.1 Installing AFG (Attic Fan Gable) model fans Installation Video: Watch the video by scanning the QR code or visit www. QuietCoolSystems.com/ support NOTE: The AFG model fans are designed to mount behind existing louvers. If no louver exists, one must be installed. Louver should be installed in the upper center section of the gable. Installing the QuietCool AFG is very easy.
NOTE: The AFG can be mounted on many other types of louvers, including triangle vents, round vents, half-round vents, etc. If the vent is smaller than the area of the fan, we recommend constructing a chamber that surrounds the vent, and then mount the AFG to the chamber to ensure maximum airflow and performance. 2.1.
Choosing the Right Location Choose a location to install your QuietCool roof mounted fan that allows for balanced airflow throughout the attic space. We always recommend the fan to be installed centrally located on the roof three feet below the ridge line. This will allow you to access the fan very easily. Your roof mount fan should not be installed any closer than within 5 feet to an existing passive vent, ridge vent, or additional fan unit.
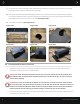
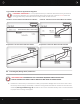
7. Lifting the fan unit up at an angle, apply weatherproof caulking to the bottom side of the fan unit. This will help keep the fan in place and will seal nice and tight. 8. With all fan cables connected and hanging inside the vent hole, slide the fan unit underneath the shingles until the fan reaches the top of the hole. Secure the fan flashing to the roof. Finish caulking around the fan and flashing it into the roof to make a nice seal. (See Figure 2.2E) 9. Your install is complete! (See Figure 2.
NOTE: If you have a tile roof, you will need to move the tiles out of the way before tracing and cutting. (See Figure 2.2A) 3. Go to the roof. Using the screw as a reference point, trace out either a 14” (RM ES-1100) or 16” (RM ES2200) diameter circle. NOTE: The RM ES-2200 will only fit 24” on center. 4. Use a reciprocating saw to cut out the traced hole pattern from the roof decking. Remove the cut out decking material from around the hole as needed. (See Figure 2.2B on pg. 6) 5.
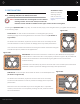
Figure 2.3D: Roof Mount Application Diagrams EXTREMELY IMPORTANT: It is very important that you install the RM fans correctly, as shown in the following diagrams, as it will dramatically affect the sound level of the fan. NEVER install the ceiling grille directly underneath the fan. Always offset at least two feet.
2. When you find the location, mark a 14 1/4” square using a framing square or template. Make sure you have 2” of clearance all the way around it. The grille that will be installed later is a 16” square. (see Figure 2.4B) 3. Starting at one corner of the square using a drywall saw, cut out the opening. Remove the drywall cutout and clear away insulation (if applicable). (see Figure 2.4C) 4. Take the GA fan model into the attic and place it over the ceiling cut out.
Figure 2.5A Figure 2.5B Figure 2.5C Figure 2.5D 4. From the interior, drill a hole through the exterior at the four corners of the cut out (see Figure 2.5A). 5. Go to the exterior and place the square wall mounting bracket aligned to the 4 drilled holes. Using a level, mark the inside of the bracket with a pencil (see Figure 2.5B). 6. Using a saw or angle grinder, cut out the marked area of stucco or siding (see Figure 2.5C). 7. Remove cut out of exterior stucco or siding.
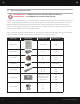
3. WIRING NOTE: Wiring Diagrams are for examples ONLY. Wiring should be done by an experienced electrician. NOTE: Your fan may have come with the thermostat pre-wired to a power cord. If this is the case, simply mount the thermostat or junction box, find a power source in your attic, and plug the fan in. If you would like to hard-wire the fan, or it is required by your local building codes, please follow the wiring instructions below. 3.1. Specialty Fan Wiring - Smart (AFG SMT-3.0 & AFR SMT-2.
3.2 Specialty Fan Wiring - Thermostat (AFG PRO-3.0, GA ES-1500, GX ES-1100, RM ES-1100, RM ES-2200) For wiring of a Specialty Series Fan with a thermostat. This wiring method works with all of our Specialty Series fans, but we do not recommend using it with a Roof Mount fan that is being used as a whole house fan. 1. For this installation, you will need a 2 wire Romex, and a thermostat. 2. Open up the thermostat that is connected to the fan. Remove the power cord.
4. Mount the thermostat in the best location for thermostat readings. Run a 2 wire Romex from the junction box to the thermostat. Tape the white wire on each side of the 2 wire Romex to indicate that it is a switch leg. 5. In the junction box, with a wire nut, tie the white common wires together. Using the green ground screw, ground the green wire from the fan and the 2 wire Romex from the thermostat, to the junction box. Tie the black wire from the fan to the taped white wire from the thermostat.
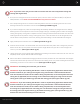
5. Then, tie the black wire from the power source to the black wire from the timer. 6. Lastly, tie the copper ground wire from the power source to the copper ground wire from the timer. Figure 3.3A ADVANCED ATTIC GABLE FANS Ground the fan to the junction box using the green ground screw ® Specialty Series Fan 14 -3 Wi re Junction Box 8 HOUR Match Wire Colors Together 4 HOUR 2 HOUR 1 HOUR 14-2 Wire 14-2 Wire HOLD Bare Copper Wires Tied Together Power Source 4. SYSTEM OPERATING INSTRUCTIONS 4.
The QuietCool Smart Attic Fan will help your attic stay cooler than with a traditional single-speed attic fan, and will help save you energy by running the fan at a lower speed (thus a lower wattage) when the attic is not as hot. 4.2 QuietCool Attic Fan Gable - Pro (AFG PRO-3.0) QuietCool Attic Fans work almost everywhere, almost anytime. During the summer, an attic can be 40-50 degrees hotter than the outside temperature, which in turn heats up the house much faster.
4.4 QuietCool Garage Fans (GA ES-1500 and GX ES-1100) QuietCool Garage Fans work great to cool your garage, man cave, or workshop. Our two models work for different applications. Our GA ES-1500 works to cool and ventilate your garage and the attic above your garage. This greatly reduced the heat transfer between the attic and garage on really hot days. Our GX ES-1100 works well to cool and ventilate your garage. Run both of these fans when it is cooler outside than it is in your garage.
SPECIALTY SERIES FANS LIMITED WARRANTY MAKERS OF THE QUIETCOOL ADVANCED WHOLE HOUSE FAN 15 YEAR LIMITED WARRANTY QUIETCOOL SPECIALTY SERIES FANS QC Manufacturing Inc. extends this warranty to the original purchaser of the following QuietCool Specialty Series Fans ---- AFG SMT-3.0, AFG PRO-3.0, AFR SMT-2.0, GA ES-1500, GX ES-1100, RM ES-1100, RM ES-2200 ---- installed and used in a residence under normal conditions within the United States: A.
QuietCool is Proudly Designed and Built in California Fan Serial Number Information Retain for your records. Serial number is required for warranty purposes. ADVANCED WHOLE HOUSE FANS ® 43352 Business Park Drive, Temecula, CA 92590 // PH 951.325.6340 // QUIETCOOLSYSTEMS.