
Installation Guide


9
1-888-QUIETCOOL
Figure 2.4A Figure 2.4B Figure 2.4C Figure 2.4D
2.5 Installing GX (Garage Exterior) model fans
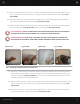
1. Determine in which area you would like to install your QuietCool Garage Exterior Mount Fan. Now it’s
time to find the exact location using a stud finder. Locate the wall studs and mark the location for
the fan to be installed (see Figure 2.4A). One side of the cut out should be directly next to a wood
member for proper fan mounting and support.
2. When you find the location, mark a 14 1/4” square using a framing square or template. Make sure you
have 2” of clearance all the way around it. The grille that will be installed later is a 16” square (see
Figure 2.4B).
3. Starting at one corner of the square using a drywall saw, cut out the opening. Remove the drywall
cutout and clear away insulation (if applicable) (see Figure 2.4C).
2. When you find the location, mark a 14 1/4” square using a framing square or template. Make sure you
have 2” of clearance all the way around it. The grille that will be installed later is a 16” square. (see
Figure 2.4B)
3. Starting at one corner of the square using a drywall saw, cut out the opening. Remove the drywall
cutout and clear away insulation (if applicable). (see Figure 2.4C)
4. Take the GA fan model into the attic and place it over the ceiling cut out. Attach the fan using screws
into the ceiling joists. (see Figure 2.4D). Install the ceiling grille. (see Figure 2.5H)
VERY IMPORTANT: CHECK TO MAKE SURE FAN BLADE SPINS FREELY AND THE FIRE DAMPER
CLOSES EASILY. MAKE SURE TO SECURE THE LATCH IN THE OPEN POSITION
AVOID BACKDRAFTS: MAKE SURE THE GARAGE FAN WILL NOT BACKDRAFT COMBUSTION
APPLIANCES IN THE GARAGE. QUIETCOOL GARAGE FANS MOVE LARGE QUANTITIES OF AIR.