
Instructions / Assembly


QUIETCOOLSYSTEMS.COM 11
WELCOME
INSTALLATION
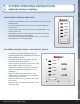
WIRING OPERATION
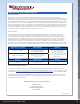
WARRANTY
NOTE: Once your QuietCool fan is hung, it’s time to go below and install the damper box and ceiling
grille.
NOTE: If you are installing the damper box with a vertical adapter, please follow the instructions on
page 12.
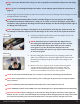
7. Look through the hole and make sure there are no kinks or twists in the ducting. Pull the damper box down
through the hole in the ceiling.
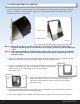
NOTE: The QuietCool Damper Box includes removable anges in the case that you are installing
the damper box between studs that are exactly 16” on center. To remove the anges, simply take a
screwdriver and pry between the ange surface and the damper box. Do this along the entire edge of
the ange and it will pop off.
NOTE: The damper box ange is designed to sit on the backside of the drywall, inside the attic. Do
not attempt to install the damper box with the anges on the outer side of the drywall in the home.
8. Using the included drywall screws, fasten the damper box to both
the drywall and the joist in the attic.
NOTE: Remember that you must fasten the damper box to
the ceiling joists AND drywall. The purpose of this is to make
sure the damper box stays in place when you are screwing
in the grille. If you do not fasten the damper box to the
drywall, the damper box will not stay in place when attempting
to screw in the grille.
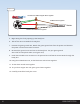
9. Remove ceiling grille and screws from its packaging. Center the
grille over the damper box. Install the grille with the white screws
provided by screwing through the drywall into the ange of the
damper box.
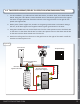
10. Return to the attic. Using the nylon straps and the long wood
screws provided, support the duct to the framing. This will
stabilize the entire assembly. Replace any insulation that was
removed. The installation of the fan is now complete.
NOTE: Do not install the QuietCool grille over a staircase, to prevent any risks during grille maintenance.
NOTE: Some ceiling surfaces are uneven and may cause a small gap to be present. This can easily be caulked
later if excessive.
NOTE: Local building codes and standards must be adhered to in the installation of this unit.
NOTE: Additional insulation can be added to the top of the damper box to provide additional sound dampening.
NOTE FOR BUILDERS: When installing prior to sheetrock, the ange should be removed on all four edges, for
both 24” and 16” on center to facilitate damper box exchange without damaging sheetrock. Damper box should
be screwed to the bottom joists from inside the damper box, away from the doors and grille insert areas.
Figure 3.1E
Figure 3.1F
!!
!!
!!
!!
!!
!!
!!
!!
!!
!!