
Instructions / Assembly


1-888-QUIETCOOL 12
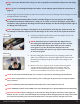
IMPORTANT: Wiring Diagrams are for examples ONLY. Wiring should be done by a licensed
electrician following local building and electrical codes and/or NEC guidelines.
NOTE FOR NEW CONSTRUCTION: Where use of arc-fault breakers are 100% implemented in the
home, or if the whole house fan is installed in a wet area such as a bathroom, wiring a dedicated
circuit may be required.
NOTE: Your fan came pre-wired to a power cord for testing purposes before installation. If you
would like to hard-wire the fan, or it is required by your local building codes, please follow the
wiring instructions below.
3.2 INSTALLING VERTICAL ADAPTER
A vertical wall adpater allows a damper box to be installed in the wall instead of the ceiling. A vertical
adapter is installed on the wall with the damper box mounted diagonally so the damper doors close
properly when the fan is turned off.
NOTE: Measure the studs in your wall. If they are 16” on center, you will need to follow steps 1
through 4 completely. If they are wider than 16” on center, you will only need to follow steps
1 & 4.
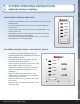
NOTE: The damper box MUST be installed with the damper doors oriented vertically. If the damper
box is mounted on the wall with the damper doors horizontally, the damper doors will not
operate correctly.
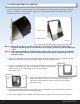
1. Note the T (TOP) side of the vertical adapter. Place the vertical adapter with the T side up onto the
damper box with the side that has only two anges, ush on the damper box.
2. If you have studs spaced at 16” on center, you will need to remove certain
anges on the damper box and vertical adapter. Using a at head screw-
driver, remove the two side anges on the vertical adapter.
(See Figure 3.2A)
3. Using a at head screwdriver, remove the two side anges on the
damper box. Make sure that you are removing the anges on the
same side as the anges you removed on the vertical adapter.
(See Figure 3.2B)
4. Using the included black sharp screws, attach the vertical adapter to the damper box by screwing
them together through the two remaining anges.
5. The vertical adapter is now installed. Go back to step 8 on page 10 and continue your installation.
DRYWALL SIDE
TOP
BOTTOM
DAMPER BOX SIDE
Figure 3.2A
Figure 3.2B
!!
!!