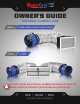
ADVANCED WHOLE HOUSE FANS ® OWNER’S GUIDE ORIGINAL CLASSIC LINE DO NOT THROW AWAY! SERIAL NUMBER FOR FAN IS LOCATED ON BACK COVER OF OWNER’S GUIDE. RETAIN IN A SAFE PLACE. S E E // H E A R // F E E L THE QUIETCOOL DIFFERENCE 1 QUIETCOOLSYSTEMS.
GENERAL SAFETY INSTRUCTIONS 1. 2. 3. 4. 5. Read Instructions - All safety and operation instructions must be read. Retain Instructions - The safety and operating instructions should be kept for future reference. Heed Warnings - All warnings should be followed. Follow Instructions - All installation and operating instructions should be followed. Water – The QuietCool system should not be used near water.
INCLUDED IN THE BOX - QuietCool Whole House Fan - QuietCool Damper Box - Accessory Bag containing needed hardware - QuietCool Duct - Cut-out Template - Ceiling Grille - Window locks (2) - Controls (if applicable) READ ALL INSTRUCTIONS IN THIS GUIDE BEFORE INSTALLING YOUR QUIETCOOL SYSTEM STOP! Read this page before proceeding! The manufacturer is NOT responsible for faulty installation or product damages caused through failure to fully read this guide BEFORE attempting installation.
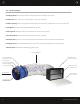
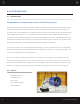
1-3 Product Diagram A. Hanging Strap: This strap is used to hang the fan from the rafters in the attic. B. Handy Box: This is where all of the wiring for the fan is contained. C. Motor Housing: This is the cylinder that houses the motor. Comes in diameters of 14”, 16”, 18” and 20”. D. Fan Blade: Computer-balanced three-blade fan system. E. Hand-guard: Added for safety to keep hands out of the motor housing. F. Acoustical Duct: R-4.2 acoustically lined duct for quiet operation. G.
1-4 When to Run the QuietCool Whole House Fans Anytime it is cooler outside than the inside of your home, the system will work effectively. In the summer this normally happens in the late afternoon to early evening, through to the next morning. We recommend running your fan through the evening. If you have a multi-speed fan, you will get the best cooling effect when you turn the fan on low after desired cooling occurs and let it run throughout the night.
2. SYSTEM OVERVIEW 2-1 INTRODUCTION Congratulations on the purchase of your new QuietCool system! The QuietCool whole house fans dominate the market in energy efficiency and quietness. Whole house fans operate by pulling the cool air from outside your home, through the living space, into your attic, and out your attic vents. This accomplishes a cooling effect that can save you up to 90% off your A/C related energy costs depending on where you live.
2-3 System Venting Recommendation FOR OPTIMAL PERFORMANCE! - 1 SQUARE FOOT OF NET FREE VENTING PER 750 CFM Venting plays a very significant role in the performace of whole house fans. QuietCool recommends a minimum of 1 SQ. FT. for every 750 CFM in the QuietCool system. If an attic has at least 1:750 attic venting, the QuietCool system will operate efficiently and effectively.
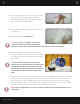
3. INSTALLATION TOOLS YOU WILL NEED - Drywall saw 3-1 - Phillips screwdriver - Pencil - Power-drill - Philips bit Installing QuietCool NOTE: Be sure to plug in your fan before attempting to install to ensure that the fan is operational and the fan blade spins freely. Installing the QuietCool system is very easy. Simply follow the steps given below: 1. Determine from down below in which areas you would like to install your QuietCool fan. Go up into the attic to mark the exact location for the fan.
3. From below, place the cut-out template on the ceiling, making sure that you have at least 2 inches of clearance all around it. While holding the template in place, mark its outline with a pencil. 4. Using a drywall saw or similar device, cut out the hole in the ceiling. 5. Open and unpack your QuietCool fan. TIP: If your attic is very tight, you may want to wire your QuietCool motor housing before bringing it into the attic. Please follow the wiring diagrams that start on page 13. 6.
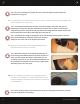
NOTE: If you are installing the damper box with a vertical adapter, please follow the instructions on page 12. 8. Look through the hole and make sure there are no kinks or twists in the ducting. Pull the damper box down through the hole in the ceiling. NOTE: The QuietCool Damper Box includes removable flanges in the case that you are installing the damper box between studs that are exactly 16” on center. To remove the flanges, simply take a screwdriver and pry between the flange surface and the damper box.
. Return to the attic. Using the nylon straps and the long wood screws provided, support the duct to the framing. This will stabilize the entire assembly. Replace any insulation that was removed. The installation of the fan is now complete NOTE: Local building codes and standards must be adhered to in the installation of this unit.
3-2 Installing Vertical Adapter (vertical adapter sold seperately) A vertical wall adapter allows a damper box to be installed in the wall instead of the ceiling. A vertical adapter is installed on the wall with the damper box mounted diagonally to the wall so the damper doors close properly when the fan is turned off. NOTE: Measure the studs in your wall. If they are 16” on center, you will need to follow steps 1 through 4 completely.
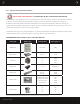
4. WIRING NOTE: Wiring Diagrams are for examples only and wiring should be done by an experienced electrician. 12 or 14-gauge romex is common. Check your local building code before choosing the wire type. 4-1 Single Speed Wiring For wiring of the CL-1500 Whole House Fan with one speed. 4-2 Two Speed Wiring For wiring of the CL-2250, 3100, 4700, and 5400 Whole House Fan with two speeds. 4-3 Two Motorhead Wiring For wiring of the CL-6400 Whole House Fan with two motorheads.
Figure A Whole House Fan Tie White Common Wires Together Tie Ground & Bare Copper Wires Together Single Speed Wiring 14-2 Wire 14-2 Wire Power Source Tie Black and Red Wires Together Black Tied Together with Black 8 HOUR 4 HOUR 2 HOUR 1 HOUR HOLD Red Switch Leg 6. Feed the 2 wire Romex through the handy box. Using the included wire nuts, tie the black wires together. Tie the white neutral wires together. Tie your bare copper wire and green ground wires together. 7.
4-2 Two Speed Wiring (for CL-2250/3100/4700/5400) 1. For this installation, you will need a 2 and 3 wire Romex, an 8 Hour Timer, and a HIGH-LOW-OFF Switch. Using the 3 wire Romex, attach the black wire to the bottom gold screw on the right of the switch for high speed and attach the red wire to the top gold screw on the right for low speed. (see Figure C) 2. With a piece of bare copper wire, attach it to the green ground screw on the switch.
5. Begin wiring the fan by opening up the handy box. Take off the wire nuts within the handy box. Unscrew the green ground wire from the handy box. Detach the green ground wire from the power cord. Remove the power cord. Re-attach the ground screw and wire to the handy box. Cut your green ground wire in half and strip both sides. (see Figure D) 6. Feed the 2 wire Romex into the handy box. Using the included wire nuts, tie the black wires together for high speed. Tie the red wires together for low speed.
Figure E Black Tied Together with Black Two Speed Wiring 14-2 Wire 14-2 Wire Tie Common Wires Together 14-2 Wire Whole House Fans Power Source Tie All Ground & Bare Copper Wires Together 4 HOUR Off On Off On 2 HOUR Black Wires 8 HOUR 1 HOUR HOLD Red Switch Leg 6. Start by wiring the first motor head. Open up the handy box and take off all the wire nuts. Unscrew the green ground wire and detach the green ground wire from the power cord. Remove the power cord.
8. Move to the second motor head. Open up the handy box and take off all the wire nuts. Unscrew the green ground wire and detach the green ground wire from the power cord. Remove the power cord.. Reattach the green ground wire to the handy box. Cut your green ground wire in half and strip both sides. (see Figure F) 9. Feed the 2 wire Romex into the handy box. Using the included wire nuts, tie the black wires together for high speed. Tie the remaining white neutral wires together.
10 YEAR LIMITED WARRANTY QC CLASSIC LINE WHOLE HOUSE FANS QC Manufacturing Inc. extends this warranty to the original purchaser of the following QuietCool Classic Line Models --- QC CL-1500, QC CL-2250, QC CL-3100, QC CL-4700, QC CL-5400 and QC CL-6400 --- installed and used in a residence under normal conditions within the United States: A. Ten year coverage applies to the QuietCool motor fan assembly.
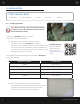
QuietCool is Proudly Designed and Built in California Fan Serial Number Information Retain for your records. Serial number is required for warranty purposes. ADVANCED WHOLE HOUSE FANS ® 43352 Business Park Drive, Temecula, CA 92590 // PH 951.325.6340 1-888-QUIETCOOL // QUIETCOOLSYSTEMS.