
Instructions / Assembly


QUIETCOOLSYSTEMS.COM
13
WELCOME
INSTALLATION
WIRING OPERATION
WARRANTY
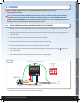
3.3 PAIRING THE WALL SWITCH
1. Using a at-head screwdriver, remove the front cover off the wall switch.
2. Install the included AAA batteries into the switch. All the LED indicators will light up
indicating that the switch has power. Replace the front cover.
3. Press and hold the Pair button on the Hub. The Pair LED indicator will be on for three
seconds then turn off. This clears all previous pairings out of the Hub,
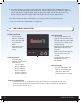
4. Press the Pair button on the Hub twice. The Pair LED indicator will blink once every second
indicating the Hub is in pairing mode.
5. Press either one of the buttons on the Wall Switch to wake it up. Now hold one of the
buttons on the switch. The Pair LED indicator on the Hub will go out and the Wall Switch
speed indicators will be blinking indicating successful pairing. Press the Wall Switch button
again, the speed indicators will go out, and it will display the current fan status.
Press the Timer button to test the Wall Switch to make sure it is communicating with
the Hub.
NOTE: If a button on the Wall Switch is not pressed within three minutes of pressing the
Pair button on the Hub, the LED indicator on the Hub will go out, indicating unsuccessful
pairing. You will need to go back and repeat steps 4 and 5.
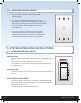
3.4 FINDING A LOCATION FOR THE WALL SWITCH
1. It is very important to nd the correct location to install the Wall Switch that will allow
the Wall Switch to communicate with the Hub.
2. Find the location you would like to install the Wall Switch and test that it properly
communicates with the fan to turn the fan on and off.
3. If the fan comes on, this is a good location.
4. If all the LED indicators turn on, the Wall Switch is not communicating with the Hub
and you will need to nd a location closer to the fan.
!
!