
Instructions / Assembly


QUIETCOOLSYSTEMS.COM
7
WELCOME
INSTALLATION
WIRING OPERATION
WARRANTY
2.2 INSTALLING THE RM WHF-4.0-DB
Use the following instructions to nish the installation
of your accessory kit.
These instructions are for installing the RM WHF-4.0
with damper box, duct,and grille
1. Using the duct clasp, connect the duct to your fan unit.
2. Determine the location for your damper box. Ensure that the
duct will t with an adequate bend between the fan unit and
damper box.
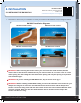
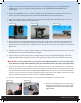
3. Go up into the attic to mark the exact location for the
damper box. Take the cardboard cutout template and a small
screwdriver with you. Make sure the template ts between
the framing.
4. When you have chosen your exact spot, place the provided
template on the spot and mark it at each corner by pushing
the screwdriver through at each corner to make a hole so that
you can nd it from below. (See Figure 2.2A & B)
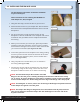
5. From below, place the cutout template on the ceiling, making
sure that you have at least 2 inches of clearance all around it.
While holding the template in place, mark its outline with a
pencil. (See Figure 2.2C)
6. Using a drywall saw or similar device, cut out the hole in
the ceiling. (See Figure 2.2D)
7. Go back into the attic and set the damper box over the hole
in the ceiling. Using the duct clasp, connect the duct to the
damper box. Make sure there are no kinks in the ducting.
NOTE: The QuietCool Damper Box includes removable
anges in the case that you are installing the damper box between studs that are exactly
16” on center. To remove the anges, simply take a screwdriver and pry between the ange
surface and the damper box. Do this along the entire edge of the ange and it will pop off.
NOTE: If installing 24” on center, remove one of the longer side anges and position that side
of the damper box against one of the joists.
NOTE: The damper box ange is designed to sit on the backside of the drywall, inside the
attic. Do not attempt to install the damper box with the anges on the outer side of the
drywall in the home.
!
!
!
!
Figure 2.2D
Figure 2.2C
Figure 2.2B
Figure 2.2A
!
!