
Instructions / Assembly


1-888-QUIETCOOL
8
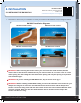
8. Using the included drywall screws, fasten the damper box
to the drywall and the joist in the attic. (See Figure 2.2E)
NOTE: Remember that you must fasten the damper
box to the ceiling joists AND drywall. The purpose of
this is to make sure the damper box stays in place when
you are screwing in the grille. If you do not fasten the
damper box to the drywall, the damper box will not stay
in place when attempting to screw in the grille. (See
Figure 2.2F)
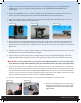
9. Remove the removable ceiling grille and screws from its
packaging. Center the grille over the damper box. Install
the grille with the white screws provided by screwing
through the drywall into the ange of the damper box. (See
Figure 2.2G)
NOTE: To remove grille core for cleaning, use the
provided grille removal tool in the corners of the grille
core. When removing the grille, make sure to hold the
core in place so it does not fall. When ready to put your
grille core back in place, simply push it right into place,
and it will snap in tight.
2.3 INSTALLING THE RM WHF-4.0-DG1
Use the following instructions to nish the installation of your accessory kit.
These instructions are for installing the RM WHF-4.0 with 22” x 22”damper grille.
IMPORTANT: The RM WHF-4.0-DG1 will only t 24” on center ceiling joists.
1. Using a stud nder, nd and measure your ceiling joists and determine the location for your damper
grille. Make sure the damper grille is installed in the same joist bay as the fan.
2. When you have chosen your exact spot, place the provided template on the spot and make sure that
you have at least 2 inches of clearance all around it. While holding the template in place, mark its
outline with a pencil. (See Figure 2.3A)
3. Using a drywall saw or similar device, cut out the hole in the ceiling. (See Figure 2.3B)
4. Remove the damper grille and screws from its packaging. Place the grille in the ceiling cutout. Install
the grille with the white screws provided by screwing through the drywall. (See Figure 2.3C)
!
!
!
!
!
!
Figure 2.2E
Figure 2.2F
Figure 2.2G