
Installation Guide


QT & PLT Series Quincy Compressor
50161-106, January 2009 33 3501 Wismann Lane, Quincy Ill. - 62305-3116
PILOT VALVE ADJUSTMENTSPILOT VALVE ADJUSTMENTS
PILOT VALVE ADJUSTMENTSPILOT VALVE ADJUSTMENTS
PILOT VALVE ADJUSTMENTS
All adjustments made to the pilot valve must be performed by a qualified technician. The adjustments must
be made while the unit is operating, therefore, extreme caution must be taken while working on the unit.
Observe all necessary precautions. Always use a back-up wrench and make all differential and unload pressure
adjustments in very small increments (1/8 turn).
WARNING !
The pressure switch and / or pilot valve are set at the factory for maximum efficiency. Adjustments to either
component must be performed by a qualified technician. Exceeding the factory recommended maximum pressure
will void the warranty and may cause personal injury.
*
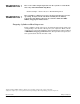
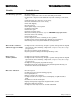
Setting Unload Pressure
*
Step 1. Flip the toggle to the
"RUN" position as
shown, or turn the
knurled knob (if so
equipped) counter-
clockwise until it
stops.
Step 2. Loosen locknut
(counterclockwise). *
Stabilize with
back-up wrench!
Step 3. Turn clockwise to increase unload pres-
sure, turn counterclockwise to decrease
unload pressure. Hold position with
wrench and proceed to Step 4.
Step 4. Tighten locknut (clockwise) with wrench.
* Stabilize with back-up wrench!
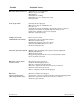
Setting Differential Pressure
Step 5. Loosen locknut (counterclock-
wise). * Stabilize with back-up
wrench!
Step 6. Turn clockwise to decrease the
differential pressure and coun-
terclockwise to increase the dif-
ferential pressure. Hold posi-
tion with wrench and proceed
to Step 7.
Step 7. Tighten locknut (clockwise)
with wrench. * Stabilize with
back-up wrench!
"MANUAL
UNLOAD"
position
(Ref.)