
Product Manual


Single Stage Series Quincy Compressor
1312101105, September 2013 7 3501 Wismann Lane, Quincy IL - 62305-3116
MAINTENANCE
The following procedures should be performed when
stopping the compressor for maintenance or service:
Step 1)Prior to performing any maintenance or
repair,alwaysturntheOFF/AUTOknobto
the “OFF”positionandperOSHAregulation
1910.147, disconnect and lockout/tagout the
main power source. Then, isolate the com-
pressed air supply by closing and locking
out a manual shutoff valve upstream and
downstream from the compressor. Display a
sign in clear view at the main power source
and at the shutoff valve stating that the
compressor is being serviced.
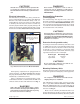
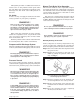
Step 2) Completely relieve the system of air pres-
sure by pulling the ring on a pressure relief
valve. Continue to pull the ring until all air
pressure escapes (see Fig. 3).
Step 3) Slowly open all manual drain valves within
the area to be serviced.
Step 4) Wait for the unit to cool before starting to
ser vice.
Maintenance Schedule
If the unit is used in an excessively dirty or dusty
envi ronment, check and perform all maintenance
procedures more often.
After First 100 Hours or First Month of Operation
(whichever occurs rst)
•Replacebreakinlubricant(refertoLUBRICA-
TION).
Daily
• Maintain lubricant level to be visible in the
center of the sight glass. Discolored lubricant
or a higher lubricant level reading may indicate
the presence of condensed liquids. (Refer to
TROUBLESHOOTING.)
•Draintheairtank,droplegsandmoisturetraps
in air distribution system. Tank(s) subjected to
freezing temperatures may contain ice. Store the
compressor in a heated area before attempting to
drain moisture from the tank(s). Never attempt
to drain these components without first relieving
the system pressure.
•Givecompressoroverallvisualinspectionandbe
sure safety guards are in place.
•Checkforanyunusualnoiseorvibration.
Weekly
• Pull on the ring of the pressure relief valves
to make sure they are operating correctly. Air
pressure should escape when the ring is pulled
(see Fig. 3).
•Checkallpressurizedcomponentsforrust,crack-
ing or leaking. Immediately discontinue use of
the equipment and relieve all system pressure
if any of these problems are discovered. Do not
use the equipment until it has been inspected
and repaired by a qualified mechanic.
•Cleantheexteriorsurfacesofthecompressor.
•Checktheairlterandreplaceifnecessary.
•Checksystemforair&/orlubricantleaks.
Monthly
•Checkbelttension.
•Checkywheelretainingbolt.
Every 3 Months (or every 300* hrs.)
•Changelubricant.Useacompressorgradenon
detergent lubricant.
Lubrication
Before starting this compressor, check the lubricant
level. It should register 1/2 way to slightly above in
the sightglass. Add lubricant to the crankcase through
the crankcase oil fill / breather port. Do not overfill.
Approximate Crankcase Lubricant Capacity
Q12120PQ & Q12126VPQ = .56 qts. (.53 lit.)
Q13160VQ = .91 qts. (.86 lit.)
AnondetergentSAE40weightlubricantmaybe
used in your compressor. Detergent lubricants are
not recommended because they have a tendency to
foam when used in compressors.
Condensation
Rust can form inside the crankcase and on internal
com ponents as a result of condensation. A compressor
must operate long enough during each run cycle to
reach full operating temperature in order to reduce
the risk of condensation.
CAUTION!
Lubricant that appears milky on the dipstick may
have mixed with condensate. Failure to replace
contaminated lubricant will result in damage to the
compressor and may void warranty.