
Service manual
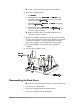
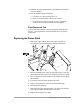

9. Align the grade sprocket and grade motor sprocket, then
tighten the setscrew on the sprocket.
10. Replace the grade motor chain as described.
11. Reassemble the siderails, uprights, and walk belt.
12. Reassemble the rack gear.
13. Adjust the walk belt tension.
14. Calibrate the grade potentiometer (see Calibration Procedures,
page 4-33).
15. Test the treadmill grade. Verify that:
a. it operates over the full range of 0-15%.
b. there is no binding when it moves up or down.
c. the grade motor chain is aligned correctly. A popping
sound in the chain indicates that it is misaligned.
Field Functional Test
To verify that the treadmill is operating properly, perform Field
Test No. 4. See Appendix D, Field Functional Tests, for specific
instructions.
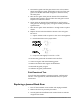
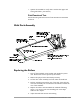
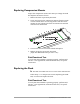
Adjusting the Grade Limit Switches
Grade limit switches prevent the treadmill from exceeding the
preset maximum grade. When a roller on the limit switch reaches
a trigger in each rack gear, a lever moves outward, opening the
switch and stopping the grade motor. Two grade limit switches,
one on each side of the treadmill, are mounted on brackets
attached to the front of the headframe.
A Grade limit switch settings are preset at the factory and normally
do not require adjustment. They should be adjusted if the rack
gear is changed.
1. Turn off the treadmill circuit breaker, then unplug the power
cord from the power source. Remove the hood as previously
described.
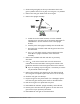
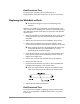
2. Loosen, but do not remove, the two Phillips screws that secure
each grade limit switch to its bracket.
3. Pivot the switch on the upper screw toward then away from
the rack gear. You should hear a click as the switch opens or
closes.
4. Set the switch wheel on a flat part of the rack gear, then pivot
the switch toward the rack gear just until it stops. Tighten
both screws.
5. If required, repeat Steps 2-4 for the other grade limit switch.
6. Replace the treadmill hood.
Repair/Replacement and Calibration 4-22