
Installation Guide


1of4
Assembly Instruction Sheet #IS-BGE2822
For Styles BGE2822AP and BGE2822WT
6 CORPORATE PARKWAY
GOOSE CREEK SC 29445
www quoizel com
,.
..
2016 QuoizelInc.
Pleasegoto forproductcleaningtips.Gotothe selection.
(4)A19MediumBaseBulbs100WMaximum.
30-45minutes
Identifyandinspectallpartsbeforebeginninginstallation.Checkpackagecontentlistanddiagramsbelowtobesureallpartsare
present.Ifanypartsaremissingordamaged,donotattempttoassemble,install,oroperatethefixture.Contactcustomerserviceforreplacement
parts.
www.quoizel.com Care+Maintenance
LightSource:
EstimatedAssembly Time:
Preparation:
ToolsRequired: Flathead screwdriver,Phillips screwdriver,pliers, wire cutters, wire strippers, electrical tape, safety glasses.
Note:This CONVERTIBLEfixturecanbemountedaspendantlightorsemi-flushlight.Refertorespective
installationsteps forinstallations.
Warnings and Cautions
Turn off electricity at circuit breaker or main fuse box before installation. Consult a licensed electrician if in doubt.
These instructions are provided for your safety. It is very important you read them completely before installing the fixture. We strongly
recommend that a licensed, professional electrician perform the installation.
Disconnect fixture from power source before replacing bulbs. Make sure bulbs are given sufficient time to cool before removal.
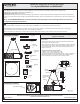
Hardware Contents
Package Contents
AA
Crossbar Assembly
x1
A
Fixture Body
x1
Thank you for purchasing a Quoizel product.
Need assistance with parts or assembly? Call Quoizel customer service at 1-800-645-3184
or visit us on-line at www.quoizel.com
ReleasedDate:2016-09-26
C
6” Rod
x2
D
12” Rod
x2
F
Stem with
Hex Nut
x1
G
Flat Washer
x2
H
Rubber Washer
x2
I
Hex Nut
x1
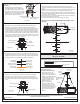
Assembly Instructions for Pendant Light
(Step 1A - Step 6A)
STEP 1A Assemble the Rods and the Socket Assembly to
Fixture Body
-
A. Determine Rods (C/D) to be assembled to Socket Assembly (E)
according to your hanging height.
B. Pass supply wires and ground wire through the chosen rods (C/D),
Swivel and Ceiling Canopy. Thread the Socket Assembly (E), the
chosen Rods (C/D), Swivel and Ceiling Canopy together. Hand
tighten until snug.
8’ ceiling : use (1) 6” rod and (2) 12” rods
9’ ceiling : use (2) 6” rods and (2) 12” rods
C. By pressing the pins underside of the ceiling canopy and push in or
pull out the cables, raise up or lower down the shades until the
Socket Assembly (E) is located in the center of shades.
Suggested rods for Ceiling height:
E
Socket
Assembly
x1
B
Diffuser
x1
J
Cap
x1
K
Finial
x1
Supply Wires
and Ground
Wire
C
C
D
D
E
Ceiling
Canopy
Swivel
Pin
Cable
Figure 1A
A
Cable