
Installation Guide
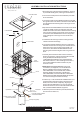

FIXTURE HOOD
GLASS PANEL
LOCK SCREW
TAB
CAGE
LOCK
SCREW
STUD
SOCKET
BAR
LOCK BALL
FIXTURE SUPPLY WIRES
and GROUND WIRE
HOUSE SUPPLY WIRES
and GROUND WIRE
(3)SCREWS
POST(not supplied)
POST FITTER
1 Beforebeginningtheassembly installation carefully
unpackandidentifyparts referringto the illustration
2 Turntheelectricalpowerto the installation point OFF
at circuit breaker.
3.Locate the CAGE onto the BAR and make the STUDS
through the holes on the BAR. Thread the LOCK BALLS
onto the STUDS and hand tighten until snug to secure
the CAGE.
5 Install the bulb referring to fixture markings and/or
labels for maximum wattage.
6.Locate the FIXTURE HOOD onto the top edge of the
CAGE and match the mounting holes on the bottom of
it with the holes on the top edge of the CAGE. Use
screw driver, thread the LOCK SCREWS into the
mounting holes and hand tighten until snug to secure
them.
7.CarefullyfitthePOSTFITTER over the end of the
POST notsupplied makingsurethePOSTFITTER
is fullyseated Markthedrillpointforthe
3 MOUNTING SCREWS using 3 MOUNTING
HOLESasreference Aftermarkinghole locations
removeFIXTUREfrom POSTanddrill1 8 pilot
holesforscrews
8 Usingwire
connectors not supplied connecttheWHITE
SUPPLYWIREfromthePOSTtotheWHITE
FIXTUREWIRE connect theBLACK orRED
SUPPLYWIREfromthePOSTtothe BLACK
FIXTUREWIRE ConnecttheSUPPLYGROUND
WIREtotheFIXTUREGROUND WIRE Wrap each
connectionwithapprovedelectrical tape
9 Coatthetop1 of the CLEAR SILICONE CAULK not
supplied and position the POST FITTER onto the
POST Besuretoseatitcompletely aligning the
holesintheFITTERwith the 1 16 PILOT HOLES
drilledintothePOST SecuretheFIXTURE to POST
with 3 MOUNTING SCREWS supplied
10 Restorepowertoinstallationpoint ON Retain this
sheetforfuturereference
./,
,.
.
.
.
(),
.
() , ()
.,
/"
.
.
(),
;()
.
.
.
." (
)
.,
/"
.
() ( ).
..
.
4 Slip down the GLASS PANELto the inside of the CAGE.
Locate theTABS onto the top edge of the GLASS
PANELandmatch the holes on them with the mounting
holes on the top edge of the CAGE. Use screw driver,
thread the LOCK SCREWS into the mounting holes
and hand tighten until snug to secure the GLASS
PANEL.
Making the wiring connections
:
ASSEMBLY INSTALLATION INSTRUCTIONS/:
6 CORPORATE PARKWAY
GOOSE CREEK SC 29445
www quoizel com
,.
..
IF IN DOUBT ABOUT ELECTRICAL INSTALLATION,
CONSULT A LICENSED ELECTRICIAN!
IS-HC9011
2007-2-28