
Installation Sheet

1of2
6 CORPORATE PARKWAY
GOOSE CREEK SC 29445
www quoizel com
,.
..
2018 QuoizelInc.
Pleasegoto forproductcleaningtips.Gotothe selection.
markingpen,1/16”
drillbit,centerpunch,hammer,drillandwrench.
(3)B10CandelabraBasebulbs60WMaximum.
www.quoizel.com Care+Maintenance
LightSource:
ToolsRequired:Flatheadscrewdriver, Phillips screwdriver,pliers,wirecutters,wirestrippers,electricaltape,safetyglasses,
EstimatedAssemblyTime:
Preparation:
20-30minutes
Identifyandinspectallpartsbeforebeginninginstallation.Checkpackagecontentlistanddiagramsbelowtobesureallpartsare
present.Ifanypartsaremissingordamaged,donotattempttoassemble,install,oroperatethefixture.Contactcustomerserviceforreplacement
parts.
Assembly Instruction Sheet #IS-MHE9010CU
For Style MHE9010CU
Thank you for purchasing a Quoizel product.
Need assistance with parts or assembly? Call Quoizel customer service at 1-800-645-3184
or visit us on-line at www.quoizel.com
Warnings and Cautions
Turn off electricity at circuit breaker or main fuse box before installation. Consult a licensed electrician if in doubt.
These instructions are provided for your safety. It is very important you read them completely before installing the fixture. We strongly
recommend that a licensed, professional electrician perform the installation.
Disconnect fixture from power source before replacing bulbs. Make sure bulbs are given sufficient time to cool before removal.
Package Contents
A
Mounting Screw
x3
E
Glass
Panel
x4
Fixture Hood
x1
B
Lock Screw
x2
D
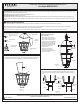
STEP 1 Install Glass Panels-
A. Glass s C (F)
t (F) Glass
Insert Panels (E) into the lot inside of the age then fold
the abs in the top of the Cage to secure the Panels (E).
Figure 1
STEP 2 Install Bulbs,
Fixture Hood and Fixture
Loop Assembly
-
A. Insert bulbs onto sockets
and screw snugly into place.
B. holes
(D)tom h s
(F). S
ing s B
m h s Hand
tighten until snug with
screwdrivers.
C.
Assembly C
D and
Align on the Fixture
Hood ounting ole
on the Cage ecure by
thread Lock Screw ( )
into ounting ole .
Thread Fixture Loop
( ) onto the
Fixture Hood ( ) hand
tighten until sung.
Figure 2
E
Fixture Loop
Assembly
x1
C
F
Fixture Body
x1
Tab
F
Bulb (not
Supplied)
C
D
B
Socket
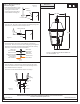
STEP 3 - Mark the Location for the 3 Mounting Holes
A. Place the light fixture onto the post and mark the location of the 3
mounting holes on the fixture fitter onto the post with the marking
pen.
Fixture
Fitter
Marking Pen
Mounting
Hole
Post
Lighting
Post
Post
Fixture
Fitter
Figure 3
ReleasedDate:2018-01-25