
Installation Guide


1of2
Assembly Instruction Sheet #IS-QR2059
For Style QR2059
Thank you for purchasing a Quoizel product.
Need assistance with parts or assembly? Call Quoizel customer service at 1-631-273-2700
or visit us on-line at www.quoizel.com
2015 QuoizelInc.
July2015
Package Contents
A
C
Mirror Hanger
x2
Mirror
x1
B
Hanger Nail
x4
Pleasegoto forproduct cleaningtips. Goto the selection.
Flatheadscrewdriver,Phillipsscrewdriver,pliers,gloves, safetyglasses.
20-30minutes
Identifyand inspectall partsbefore beginninginstallation. Checkpackage contentlist anddiagrams belowto besure allparts are
present.If anyparts aremissing ordamaged, donot attemptto assemble,install, oroperate themirror.Contactcustomer servicefor replacement
parts.
www.quoizel.com Care+ Maintenance
ToolsRequired:
EstimatedAssemblyTime:
Preparation:
Warnings and Cautions
These instructions are provided for your safety. It is very important you read them completely before installing the mirror. We strongly
recommend that a licensed, professional electrician perform the installation. Quoizel recommends 2 people for each step during assembly.
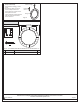
Option A Identify Nail Points for mounting the Mirror Hangers
By Using Template
-
The template included with package is provided to assist you in placing
the mirror in the location you desire. The template is a full size drawing
of your mirror and includes hanger mounting locations that your mirror
maybe hung.
Place the template on the wall in the location you have selected for
your mirror. Once you have the template in the location you desire and
making sure it is level you may tape or pin the template to the wall. Now
you may mark the holes for the mounting hardware as indicated on
your template. You may mark the mounting hardware location by either
using a pin and pushing it through the template leaving a small hole on
the wall. Or you may use a pencil and place a mark on the wall through
a small hole you cut into the template at the correct mounting location.
Remove the template from the wall and install the Mirror Hangers as
described in Step 1.
NOTE: There are two options (Templates or Measurement) for
identifying correct locations for Nails.
Mark Nail Locations
On The Wall At
Arrow Locations
TEMPLATE
10.25”
7.5”
Figure A
Option B Identify the Points for
mounting the Mirror Hangers By Using
Measurement
-
A. Determine where the mirror will be
placed on the wall and hold the mirror on
the wall in the position you wish. Mark
the wall at the bottom center of the mirror
with a pencil lightly. This will be
Measurement A, the distance from the
floor to the bottom of the mirror.
B. Place the mirror on a flat surface again
and measure from the bottom of the
mirror to the hangers that will be used to
hang the mirror, this is measurement B.
C. Add measurement A from step A above
Figure B1
Hanger
" A”
Floor
Surface
" B”
" C”
BACK
and measurement B together and mark this spot on the wall where
the mirror will be hung. Measurement B is straight up from
Measurement A you marked on the wall in step A above.
D. Measure the distance between the centerline of each hanger and
then divide this measurement by 2, this is Measurement C. In order
to locate the exact hanger location on the wall, from Measurement B
go to the right the distance of Measurement C and mark the wall. Do
this going to the left of Measurement B as well and mark the wall.
These two marks are the center of the hangers, Measurement C. The
two marks you just made on the wall are the same distance apart as
the two hangers.
C
Mirror Hanger
Hook
Mark "B"
3”
C
E. (Refer Figure B2) To determine where
the Mirror Hangers (A) will be fastened
to the wall, measure up from
Measurement C 3”. Do this in two
locations as illustrated and mark the
wall.
F. Refer to Step 1 to install Mirror Hangers
on thw wall.
Figure B2
STEP 1 Installing the 2 Mirror Hangers
Please note the Mirror Hangers are
adjustable allowing for easy leveling
of the mirror as needed.
-
A. Using the Nails (B) provided with the
Mirror Hangers (A) attach the 2 Mirror
Hangers (A) to the wall at the position
just marked by Option A or Option B.
B. Once you have both Mirror Hangers (A)
securely nailed in place, adjust as the
length of the Mirror Hangers (A) so that
each Mirror Hanger (A) is the same
length.
Figure 1
Hanger Nail
Mirror Hanger
Adjustment Screw
Hook
STEP 2 Hanging the Mirror-
A. With the help of another person place the mirror onto the mirror
hanger hooks. Making sure each hook is securely hooked into the
21.25”
10.25”