
Installation Guide

1of1
Thank you for purchasing a Quoizel product.
Need assistance with parts or assembly? Call Quoizel customer service at 1-631-273-2700
or visit us on-line at www.quoizel.com
2014 QuoizelInc.
December2014
REV.A
ToolsRequired: Flatheadscrewdriver, Phillipsscrewdriver.
LED5W
20-30minutes
Identifyandinspectall partsbefore beginninginstallation. Checkpackage contentlist anddiagrams belowto besure allparts are
present.If anyparts aremissing ordamaged, donot attemptto assemble,install, oroperate thefixture. Contactcustomer servicefor replacement
parts.
BulbRecommended:
Estimated Assembly Time:
Preparation:
Warnings and Cautions
Assembly Instruction Sheet #IS-TF7110ZLED
For Style TF7110ZLED
6 CORPORATE PARKWAY
GOOSE CREEK SC 29445
www quoizel com
,.
..
Turn off electricity at circuit breaker or main fuse box before installation. Consult a licensed electrician if in doubt.
These instructions are provided for your safety. It is very important you read them completely before installing the fixture. We strongly
recommend that a licensed, professional electrician perform the installation.
Disconnect fixture from power source before replacing bulbs. Make sure bulbs are given sufficient time to cool before removal. Do not subject
glass parts to any shock while in operation or shattering may result.
Care of Tiffany Style Shade
A new tiffany lamp shade has an oil film applied to the shade that protects the tiffany shade from scratches during shipment. If the oil applied is
too heavy you can remove the excess oil film with a paper towel. Gently wipe away the excess oil.
For general cleaning of tiffany shades use a gentle lemon oil-based furniture polish applied to a soft cloth and wipe gently.
If a white powder appears on the soldered joints of the tiffany shade this is a normal oxidation process. Use a small amount of lemon oil or
mineral oil applied directly to oxidized areas and the soldered area will return to like new.
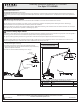
TF7110ZLED
FINISH: MEDICI BRONZE
PART NUMBER
NOTE: ALL DIMENSIONS ARE ROUNDED UP TO THE NEAREST 1/2"
REPLACEMENT PART DESCRIPTION
NO.
1
2
REQ.
6” Dia.
2.5”
19”
6” Dia.
Socket
Assembly
x1
Shade
x1
lock screws
x2
Transformer
x1
Adjustment
Buttons
A. Attach the shade onto the shade holder and secure with the lock
Screws. Hand tighten until snug.
B. Insert the Transformer into the cord from the Base as shown.
C. Adjust the Support Arm and the Shade Holder to proper location by
adjust the Adjustment Buttons.
Your fixture is now assembled and ready to use. Enjoy!
1
2
G3929SH
SHADE 1
K809BL
LED DRIVER W/CORD 24V-500mA RIGHT ANGLE
1