Installation guide PRO3-VAQ B Before installing read this guide first
Introduction The operation of the Quooker VAQ B The Quooker system consists of a vacuum-insulated tank, which is connected to the cold water supply under the sink and to the Nordic boiling-water tap or Fusion tap. Both boiling water and mixed water can be drawn off from the Fusion tap. Inside the tank the water is heated electrically to approx. 110°C and is kept at this temperature. The Quooker PRO3-VAQ B has a capacity of 3 litres. Before the water leaves the tank it is purified by the HiTAC® water filter.
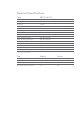
Technical Specifications Tank PRO3-VAQ B Voltage Wattage Capacity Heating-up time* Standby power consumption Tank height Tank diameter Min. mains pressure Max. mains pressure Max.
Contents of the pack 1. PRO3-VAQ B tank 2. Nordic boiling-water tap, packing ring, centring ring, steel ring, brass sink nut and two screws or Fusion tap, packing ring, brass fixing plate, fixing nut, white tap support (for thin work tops) and two inlet hose screens 3. Quooker inlet valve with packing ring 4. Angle stopcock with filter and packing ring 5.
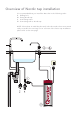
Overview of Nordic tap installation It's recommended that you install the Quooker in the following order: A. Drilling hole B1. Fitting Nordic tap C. Connecting water D1. Connecting tank to Nordic tap NOTE: Please bear in mind that the tank, inlet valve and socket must remain easily accessible for servicing. For an overview of the Fusion tap installation please refer to the next page.
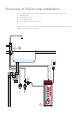
Overview of Fusion tap installation It's recommended that you install the Quooker in the following order: A. Drilling hole B2. Fitting Fusion tap C. Connecting water D2. Connecting tank to Fusion tap NOTE: Please bear in mind that the tank, inlet valve and socket must remain easily accessible for servicing.
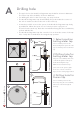
A 1 Drilling hole • The tap hole for the Nordic boiling-water tap should be 32 mm in diameter. The Fusion tap hole should be 35 mm in diameter. • For drilling the hole for the Fusion tap, see step 3 below. • The Nordic boiling-water tap should ideally be positioned at the corner of the sink to enable use above the sink or the work top. • It must be possible to move the spout of the Nordic boiling-water tap freely up and down. When the spout is in its lowest position it projects ca.
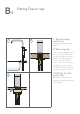
B 1 Fitting Nordic tap 1 • The total length of the hose between the boiling-water tap and tank is only 70 cm. The tank must therefore be fitted close to the tap. Extension hoses are available in different lengths but are not normally required. • The small fibre washers supplied with the tap rings are not required yet at this point. One will be used for connecting the tap and tank hose (see section E), the second one is a spare. 2 1 Tap through work top Push the tap through the hole in the work top.
B 1 Fitting Fusion tap 2 2 1 Tap through work top Push the tap through the hole in the work top. 2 Securing tap Position the brass fixing plate around the hoses. Screw the fixing nut onto the tap thread. Adjust the position of the tap to ensure that the Quooker logo is facing the user. When the handle is in the cold position, it will be parallel to the edge of the work top. Tighten the fixing nut with a pipe wrench, socket wrench or spanner.
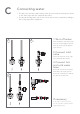
C 1 Connecting water • The Quooker operates under mains water pressure and must always be fitted to the water pipe with the supplied inlet valve. • The Nordic boiling-water tap or the Fusion tap must be installed according to the locally applicable regulations. 2 1 Shut off water Before installation, shut off the angle stopcock or water supply to the main water tap. If necessary, fit supplied angle stopcock. 2 Connect inlet valve Connect the inlet valve to the angle stopcock with the fibre washer.
D Connecting tank to Nordic tap 1 • The Quooker tank is supplied with a UK 3 pin plug and requires a standard 13 amp earthed socket. • If the mains lead is damaged, it must be replaced by the manufacturer, their agent or a qualified technician. • The Nordic boiling-water tap is equipped with a light ring that shows whether the heating element is in operation or not. When touched the ring lights up to draw attention to the fact that boiling water can be released. • The ‘Q’ on the lid is the on/off switch.
D Connecting tank to Fusion tap 2 • The Quooker tank is supplied with a UK 3 pin plug and requires a standard 13 amp earthed socket. • If the mains lead is damaged, it must be replaced by the manufacturer, their agent or a qualified technician. • The Fusion tap is equipped with a light ring that shows whether the heating element is in operation or not. When touched the ring lights up to draw attention to the fact that boiling water can be released. • The ‘Q’ on the lid is the on/off switch.
E 1 Disconnecting tank • In case of service 2 1 Switching off Switch the Quooker off using the on/off switch on top of the lid. Leave the plug in the socket. 2 Draining Open the boiling-water tap and leave the water running until it is cold. 3 Isolating Shut off the main water tap or the angle stopcock for cold water. Check that the Quooker has depressurised by opening the tap again. 4 Disconnecting 3 4 Unplug LED cable from lid. Release the hose connections and pull the plug out of the socket.
Declaration of conformity Quooker B.V.
AE | 30.398.09 | V01 www.quooker.ae Q U O O K E R E M I R A T E S L L C King Abdulla Bin Abdul Aziz Al Saud Street 34 Building C06 (1st floor) PO Box 113100 Abu Dhabi (AE) E-mail info@quooker.