
Owner`s manual


10
To convert PIEZO LIT MANUAL UNITS (only) from propane to natural gas or from natural to propane gas, carefully
follow the steps below:
1. SHUT OFF THE GAS SUPPLY TO THE UNIT AND ANY NEARBY ELECTRICAL SOURCES OR APPLIANCES.
2. If present, remove all decorative media from the unit.
3. If installed, remove the screws attaching the burner pan to your enclosure.
4. The control panel bottom plate must be removed to allow access to the valve assembly found inside. Remove the
screws found along the bottom of the control panel sides. (There are 2-3 screws found on the bottom of each side.)
5. Detach the thermocouple (taking care not to kink it) from the safety valve (see Fig. 10-2 for location). Detach the
ignitor wire from the piezo igniter (see Fig.10-3 for location).
6. Carefully detach the fl ex connector attached to the orifi ce holder (found on the end of the burner pipe, see Fig. 10-4),
then unscrew the orifi ce holder from the burner pipe (see Fig. 10-5).
Note: If you are converting to and using natural gas you MUST install the air shutter over
burner pipe to cover the air holes (see Fig. 10-5). For propane (L.P.) gas, remove the air
shutter.
Replace the orifi ce holder and reattach the fl ex connector (coming from the valve, see Fig.
10-4). The regulator must now be converted to the new gas type.
8. The regulator is situated after the valve (see Fig. 10-2), inside the control panel. To convert
the regulator to the required gas type:
a) Unscrew and remove the cap (see Fig. 10-1) from the regulator, extracting the converter.
Note: If necessary, carefully rotate the regulator to access the cap.
b) Remove the converter (the red plastic stalk, Fig. 10-1) by carefully pulling it away from
the center of the cap (it will snap out of its seating).
c) Turn the converter around and replace carefully into the center of the cap (it will snap into place). Check that
you can read the type of gas the unit is set for.
Note: EACH END OF THE PLASTIC CONVERTER IS EMBOSSED WITH EITHER THE LETTERS “NAT” OR “L.P.”
FOR THE RESPECTIVE GAS TYPE ("NAT." for natural - "L.P." for propane). WHEN THE CONVERTER
IS IN THE CAP AND THE CAP IS HELD UPPERMOST, THE LETTERS SEEN (AT THE BOTTOM OF THE
STALK) INDICATE THE GAS THAT THE REGULATOR IS SET UP FOR. (Fig. 10-1 shows the converter set
for propane gas.)
d) Replace the cap and converter into the regulator and screw down until snug.
9. Once the above steps are complete, reattach the thermocouple and ignitor wires. Reinstall the control panel bottom
plate.
10. Restore your gas supply and check for leaks per the INSTALLATION section. When no leaks are detected, fasten
the burner pan back into place on the enclosure and replace the decorative media.
Connector from valve attached to orifi ce holder
on burner pipe
Detach connector from orifi ce holder when
changing orifi ce to a different gas type.
Fig. 10-4
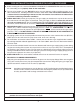
Fig. 10-2
Valve
Thermocouple
wire
(Detach this when
changing gas type.
Reattach before use.)
Do not overtighten.
Regulator
(Remove cap to convert
when changing gas type.
Replace before use.)
Fig. 10-3
Ignitor module (interior view)
Ignitor wire
(Detach when changing orifi ce
for different gas type. Replace
before use.)
Fig. 10-5
Burner
pipe
Air shutter (Used only with
natural gas. Removed for
propane gas.)
Orifi ce holder
Fig. 10-1
(Showing propane)
Read gas
type here
Regulator stalk removed
(Manual unit only)
(Manual unit only)
CONVERTING TO A DIFFERENT GAS TYPE (PIEZO LIT)
Valve shown out of
control box for clarity
Detach connector from fuel injector/air mixer and replace with
air mixer/fuel injector when changing to a different gas.
Connector from valve attached to fuel injector/air
mixer on burner pipe
Fig. 10-4
Fuel
injector
6. Carefully detach the fl ex connector attached to the fuel injector or air mixer (see Fig. 10-4) and unscrew the air mixer
from the burner pipe.
7. Replace the fuel injector/air mixer with the proper air mixer/fuel injector for your requirement
and reattach the connector from the valve (see Fig. 10-4). The regulator must now be converted
to the new gas type.