
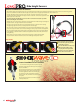
Installation guide


2
This guide covers installation of all RidePRO e3®, LevelPRO™ and AirPod™ systems. It is
important to know what system you are installing and what sections pertain to your
application. Check below to ensure you understand your system’s conguration.
Part #
ARC4000L LevelPro 4 way system / 3 gal. Tank
ARC4100L LevelPro 4 way w/dual comp. / 5 gal. Tank
ARC4700L LevelPro BIG RED 4 way / 5 gal. Tank
ARC4800L LevelPro BIG RED MAX / two 5 gal. Tanks
LEV8000 LevelPro electronics package
LEV8500 LevelPro upgrade for RidePro E3
Part #
APOD4100L 5 gal. Tank, 2 comp. LevelPro
APOD4000L 3 gal. Tank, single comp. LevelPro
APOD4100e3 5 gal. Tank, 2 comp. RidePro e3
APOD4000e3 3 gal. Tank, single comp. RidePro e3
Part #
ARC4000e3 RidePro e3 4 way system / 3 gal. Tank
ARC4100e3 RidePro e3 4 way /dual comp. / 5 gal. Tank
ARC4700e3 RidePro e3 BIG RED 4 way / 5 gal. Tank
ARC4800e3 RidePro e3 BIG RED / two 5 gal. Tanks
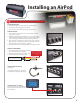
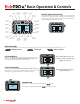
AirPod™ electronics & controls are identical
to LevelPRO™ and RidePRO e3® systems
LevelPRO™ systems use level sensors
& air pressure sensors
RidePROe3® systems use
pressure sensors only
Systems covered in this manual:
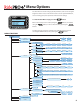
Skipping the Calibration:
Upon initial installation the E3 requests that you perform the Calibration Sequence.
The Calibration does not need to be run upon initial installation. If the vehicle is
still in the build stages you can postpone Calibration until the vehicle is complete.
You still have full manual control of each air spring and the pressure readings
from each air spring are displayed on the screen.
However, until the Calibration Sequence has been completed your preset
functionality will not perform properly.
Calibration:
During the Calibration sequence the e3 records information specic to the vehicle in which it is installed (inate and deate speed, if level sensors are
present, how long the compressors take to ll the storage tank, etc.) The e3 then uses this information to attain the proper preset heights in the fewest
possible steps, using the most intelligent method. For example, after calibration the e3 knows that the front of the vehicle is heavier and therefore
slower than the rear, so it will inate the front rst then allow the rear to catch up just as the vehicle is achieving ride height.
Calibration Steps: (items in red require user interface, other steps are automatically completed)
1. Releasing all air - this provides a solid starting point for the Calibration sequence
2. Locating tank pressure sensor - locates and checks the tank sensor
3. Locating air spring pressure sensors - locates and checks the air spring pressure sensors
4. User must raise to Max, then press and hold Preset #3 - sets the upper limit of suspension travel
5. Locates level sensors (if present) - level sensors will be automatically displayed if present
6. Determines suspension type - dierent suspension types will utilize dierent software to achieve preset heights
7. User must set Preset #2 - allows the user to set the Ride Height
8. Check vehicle speed to and from Preset #2 - the e3 will utilize this information to achieve Ride Height in the fewest possible steps using the most
intelligent method
9. Determines how much air pressure is required to slightly lift the vehicle - this information allows the e3 to more eciently manage air usage
10. Determines vehicle speed from lowered height to Preset #2 - the e3 will utilize this information to achieve Ride Height in the fewest possible
steps using the most intelligent method
11. Deates down to Preset #1 - tests the system for deating to Preset #1
12. Uses Calibration data to travel to Preset #2 - tests the system for inating to Preset #2
13. Calibration complete
air
pod
air
pod
air
pod
TM
TM
TM
LevelPRO™ and RidePRO e3® Systems dier only in the addition of the ride height sensors.
Quick Start
00
00
Setup Required
Press 3 to start setup.
Tank: 0