
Installation guide


3
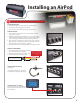
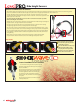
MOUNT THE MAIN UNIT:
1- Mount the base at to the vehicle surface (do not bend the base)
2- Secure the base with self tapping screws or bolts.
3 - Secure the cover to the airpod base using the supplied screws.
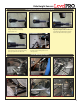
CONNECT AIR LINES:
1 - Airline cuts must be straight and clean - use a razor blade or tubing
cutter. (part # - cut1000)
2 - All ttings are DOT approved, reusable, push-to-connect style. Firmly
push the airline into the tting to attach. To release the airline push the
collar on the tting back towards the tting and pull the airline out.
3 - All of our airlines are DOT approved so they are very strong. Secure the
airline with zip ties, keep them away from any sharp edges and when
passing through a hole in the frame use a grommet.
4 - Keep away from intense heat including muers and exhaust manifolds.
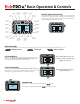
CONNECT POWER HARNESS:
1 - Connect the red power wire directly to the battery.
Use included fuse within 18” of battery.
2 - Connect the yellow ignition wire to switched 12v.
3 - Connect the black wire to chassis ground.
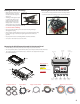
CONNECT LEVELPRO SENSORS
if equipped:
See LevelPRO section for more information
on installing and calibrating height sensors.
CONNECT DISPLAY / CONTROLS:
See control programming and additional
features section for more information on using
the control panel.
POWER RED
SWITCHED YELLOW
GROUND BLACK
Be sure to use included fuse
holder in the battery feed
wire as close to the battery
as possible.
CAUTION: Use 10 gauge wire or larger
to extend red power feed if needed
Installing an AirPod
Remove the negative battery cable before beginning installation.
STOP
AirPod Part #: APOD4000L APOD4000e3 APOD4100L APOD4100e3