
Installation guide


8
PSI
99
PSI
99
PSI
50
PSI
50
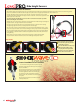
Left Front
Inflate
Left Front
Deflate
Left Rear
Inflate
Left Rear
Deflate
Right Front
Inflate
Right Front
Deflate
Right Rear
Inflate
Right Rear
Deflate
Preset #1 Preset #2 Preset #3
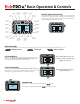
Left Front
Air Pressure
Tank
Pressure
Left Front
Level Sensor
Position
Right Front
Air Pressure
Menu
Button
Right Front
Level Sensor
Position
Left Rear
Air Pressure
Left Rear
Level Sensor
Position
Right Rear
Air Pressure
Right Rear
Level Sensor
Position
Error Warning
Indicator
PSI
99
PSI
99
PSI
50
PSI
50
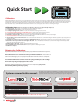
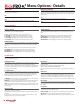
Basic Operation & Controls
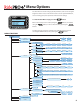
PRESET BUTTONS
There are three preset buttons located on the lower portion of the display. These can be learned to any height, but normally they are set as:
=Deated Setting =Ride Height =Inated Setting
SETTING PRESETS
Use inate and deate buttons to obtain desired vehicle height. To store the
height as a preset press and hold the preset button for 5 seconds or more.
The screen will display “Preset is saved” when completed
SELECTING PRESETS
To select a preset press and hold the preset button for a half-second and no
longer than 5 seconds. (The delay is required to minimize accidental activation
of presets.) The screen will display “Preset selected” when activated.
INFLATE & DEFLATE BUTTONS
You have full manual control at any time. To inate an air spring simply press
and hold the corresponding “+” button. To deate an air spring simply press
and hold the corresponding “-” button. The corresponding air spring will be
inated OR deated until the button is released.
Press preset for 0.5 second
to activate preset
Press and hold for over 4.5
seconds to store current ride
height as a preset
PSI
99
PSI
99
PSI
50
PSI
50
Preset 2 selected
PSI
99
PSI
99
PSI
50
PSI
50
Preset 2 saved
TANK BUTTON
Tank pressure can be viewed at any time by pressing the button.
The tank pressure will be displayed until the button is pressed again.
139 PSI
TANK PRESSURE:
Press TANK to exit.