
Instruction manual


UNI FLAME AUTOLIFT
OPERATION
Of the torch
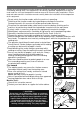
CAUTION:
Before inspecting or changing the parts of the torch, disconnect the power supply to
the unit. Special tools are not required to replace torch parts. Simply unscrew the shield
cup and all the components of the torch can easily be replaced.
CAUTION:
Unscrew the sheild cup only after the cooling air flow has stooped
(the in observance of this precaution may damage the torch body)
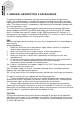
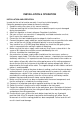
1 Check the condition of the Electrode, Cutting tip and the Shield cup.
A worn electrode has a central 1.5-2mm deep crater.
New Electrode Worn Electrode
2 Make sure that the hole in the cutting tip is not too wide or deformed.
An excessively wide or deformed hole may cause problems for the cutting arc.
3 Check whether the holes in the protective ring are clean. Blocked holes or a
damaged ring may damage the torch due to overheating.
4 Check the condition of the torch sheath, making sure it has no parts which are worn
or cut or signs of electrical discharge. Replace worn or damaged parts immediately.
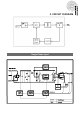
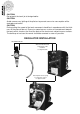
Of the unit:
Maintenance can only be carried out on the unit if the person in charge of this
operation has the necessary technical qualifivations, knowledge and the correct tools,
If this is not the case, contact your nearest service centre.
1 Inspect the unit every 3 - 4 months (depending on how often the unit is used) and
use compressed air to remove any dust deposits, This must be carried out by a quali-
fied service agent.
CAUTION: Only use dry compressed air for cleaning.
Do not point jet of air at the electronic circuits.
2 Check the air filter regularly. Any condensate must be drained off immediately when
the compressed air supply is removed. To simplify this operation,
the plasma cutter should be disconnected from the compressed air supply unit
whenever it is left unused for more than 1 week.