
User`s manual


User’s Manual 11
2.2.3 Connect Power
When all other connections have been made, you can connect power to the Jackrabbit.
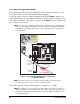
First, prepare the AC adapter for the country where it will be used by selecting the plug.
The Jackrabbit Development Kit presently includes Canada/Japan/U.S., Australia/N.Z.,
U.K., and European style plugs. Snap in the top of the plug assembly into the slot at the
top of the AC adapter as shown in Figure 2, then press down on the spring-loaded clip
below the plug assembly to allow the plug assembly to click into place.
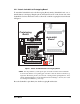
Hook up the connector from the AC adapter to header J1 on the Jackrabbit board as shown
in Figure 2. The orientation of this connector is not important since the VIN (positive)
voltage is the middle pin, and GND is available on both ends of the three-pin header J1.
Plug in the AC adapter. The Jackrabbit board and the Prototyping Board are ready to be
used.
NOTE: A RESET button is provided on the Prototyping Board (see Figure 1) to allow
hardware reset without disconnecting power.
To power down the Jackrabbit, unplug the power connector from J1. You should discon-
nect power before making any circuit adjustments in the prototyping area, changing any
connections to the board, or removing the Jackrabbit from the Prototyping Board.