
User`s manual


User’s Manual 41
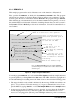
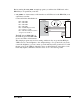
• The programming cable must be connected to the Jackrabbit board. (The colored wire
on the programming cable is closest to pin 1 on header J3 on the Jackrabbit board, as
shown in Figure 2.) The other end of the programming cable must be connected to the
PC serial port. The COM port specified in the Dynamic C Options menu must be the
same as the one the programming cable is connected to.
• To check if you have the correct serial port, select Compile, then Compile BIOS, or
type <Ctrl-Y>. If the “BIOS successfully compiled …” message does not display, try a
different serial port using the Dynamic C Options menu until you find the one you are
plugged into. Don’t change anything in this menu except the COM number. The baud
rate should be 115,200 bps and the stop bits should be 1.
Single-Stepping
Compile or re-compile DEMOJR1.C by clicking the Compile button on the task bar. The
program will compile and the screen will come up with a highlighted character (green) at
the first executable statement of the program. Use the F8 key to single-step. Each time the
F8 key is pressed, the cursor will advance one statement. When you get to the for(j=0,
j< ...
statement, it becomes impractical to single-step further because you would have
to press F8 thousands of times. We will use this statement to illustrate watch expressions.
Watch Expression
Type <Ctrl-W> or chose Add/Del Watch Expression in the Inspect menu. A box will
come up. Type the lower case letter j and click on add to top and close. Now continue
single-stepping with F8. Each time you step, the watch expression (j) will be evaluated
and printed in the watch window. Note how the value of j advances when the statement
j++ is executed.
Break Point
Move the cursor to the start of the statement:
for(j=0; j<1000; j++);
To set a break point on this statement, type F2 or select Breakpoint from the Run menu.
A red highlight will appear on the first character of the statement. To get the program run-
ning at full speed, type
F9 or select Run on the Run menu. The program will advance
until it hits the break point. Then the break point will start flashing and show both red and
green colors. Note that LED DS3 is now solidly turned on. This is because we have passed
the statement turning on LED DS3. Note that j in the watch window has the value 25000.
This is because the loop above terminated when j reached 25000.
To remove the break point, type F2 or select Toggle Breakpoint on the Run menu. To
continue program execution, type F9 or select Run from the Run menu. Now the LED
should be flashing again since the program is running at full speed.
You can set break points while the program is running by positioning the cursor to a state-
ment and using the F2 key. If the execution thread hits the break point, a break point will
take place. You can toggle the break point off with the F2 key and continue execution with
the F9 key. Try this a few times to get the feel of things.