RabbitCore RCM2000 C-Programmable Module Getting Started Manual 019–0080 • 050501–G
RabbitCore RCM2000 Getting Started Manual Part Number 019-0080 • 050501–G • Printed in U.S.A. ©2001–2005 Z-World Inc. • All rights reserved. Z-World reserves the right to make changes and improvements to its products without providing notice. Trademarks Rabbit is a registered trademark of Rabbit Semiconductor. Rabbit 2000 and RabbitCore are trademarks of Rabbit Semiconductor. Z-World is a registered trademark of Z-World Inc. Dynamic C is a registered trademark of Z-World Inc. Z-World, Inc.
TABLE OF CONTENTS Chapter 1. Overview 1 1.1 RCM2000 Description ..........................................................................................................................1 1.2 Physical and Electrical Specifications ..................................................................................................2 1.3 Development Software .........................................................................................................................3 1.4 How to Use This Manual ....
RabbitCore RCM2000
1. OVERVIEW The RCM2000 series of RabbitCore modules is an advanced line of modules that incorporates the powerful Rabbit® 2000 microprocessor, flash memory, and static RAM, all on a PCB not much larger than the size of a business card. Throughout this manual, the term RCM2000 refers to the complete series of RCM2000 RabbitCore modules unless other production models are referred to specifically.
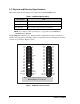
1.2 Physical and Electrical Specifications Table 2 lists the basic specifications for all models in the RCM2000 series. Table 2. RCM2000 Specifications Specification Data Power Supply 4.75 – 5.25 V DC (120 mA at 25.8048 MHz clock speed) Size 1.90 × 2.30 × 0.55 inches (48.3 × 58.4 × 14 mm) Environmental –40°C to 70°C, 5–95% humidity, noncondensing NOTE: For complete product specifications, see Appendix A in the RabbitCore RCM2000 User’s Manual.
1.3 Development Software The RCM2000 modules use the Dynamic C development environment for rapid creation and debugging of runtime applications. Dynamic C provides a complete development environment with integrated editor, compiler and source-level debugger. It interfaces directly with the target system, eliminating the need for complex and unreliable in-circuit emulators. Dynamic C must be installed on a Windows workstation with at least one free serial (COM) port for communication with the target system.
1.4 How to Use This Manual This Getting Started manual is intended to give users a quick but solid start with RCM2000 modules. It does not contain detailed information on the module hardware capabilities or the Dynamic C development environment. Most users will want more detailed information on some or all of these topics in order to put the RCM2000 to effective use. 1.4.
1.4.3 Using Online Documentation We provide the bulk of our user and reference documentation in two electronic formats, HTML and Adobe PDF. We do this for several reasons. We believe that providing all users with our complete library of product and reference manuals is a useful convenience. However, printed manuals are expensive to print, stock, and ship.
6 RabbitCore RCM2000
2. GETTING STARTED This chapter describes the RCM2000 hardware in more detail, and explains how to set up the accompanying Prototyping Board. NOTE: This chapter (and this manual) assume that you have the RabbitCore RCM2000 Development Kit. If you purchased an RCM2000 module by itself, you will have to adapt the information in this chapter and elsewhere to your test and development setup. 2.
2.2 Overview of the Prototyping Board The Prototyping Board included in the Development Kit makes it easy to connect an RCM2000 module to a power supply and a PC workstation for development. It also provides an array of basic I/O peripherals (switches and LEDs), as well as a prototyping area for more advanced hardware development. For the most basic level of evaluation and development, the Prototyping Board can be used without modification.
2.3 Connections 1. Attach RCM2000 to Prototyping Board Turn the RCM2000 so that the Rabbit 2000 microprocessor is facing as shown below. Plug RCM2000 headers J1 and J2 on the bottom side of the RCM2000 into the sockets of headers J1 and J3 on the Prototyping Board.
2. Connect RCM2000 to PC Connect the 10-pin connector of the programming cable labeled PROG to header J3 on the RCM2000 module as shown in Figure 4 below. Be sure to orient the red edge of the cable towards pin 1 of the connector. (Do not use the DIAG connector, which is used for a normal serial connection.) The holes shown near J1 and J2 at the top of the RCM2000 exist to align the board for factory testing. Do not use these holes for mounting.
3. Power Supply Connections Hook up the connector from the wall transformer to header J5 on the Prototyping Board as shown in Figure 4. The orientation of this connector is not important since the VIN (positive) voltage is the middle pin, and GND is available on both ends of the three-pin header J5. Plug in the wall transformer. The power LED on the Prototyping Board should light up. The RCM2000 and the Prototyping Board are now ready to be used.
2.4 Run a Sample Program If you already have Dynamic C installed, you are now ready to test your programming connections by running a sample program. If you are using a USB port to connect your computer to the RCM2000 module, choose Options > Project Options and select “Use USB to Serial Converter” under the Communications tab. Find the file PONG.C, which is in the Dynamic C SAMPLES folder.
2.5 Where Do I Go From Here? If everything appears to be working, we recommend the following sequence of action: 1. Run all of the sample programs described in Chapter 3 to get a basic familiarity with Dynamic C and the RCM2000’s capabilities. 2. For further development, refer to the RabbitCore RCM2000 User’s Manual for details of the module’s hardware and software components. A documentation icon should have been installed on your workstation’s desktop; click on it to reach the documentation menu.
14 RabbitCore RCM2000
3. SOFTWARE INSTALLATION & OVERVIEW To develop and debug programs for the RCM2000 (and for all other Z-World and Rabbit Semiconductor hardware), you must install and use Dynamic C. Dynamic C is an integrated development system for writing embedded software. It runs on an IBMcompatible PC and is designed for use with Z-World single-board computers and other single-board computers based on the Rabbit microprocessor. Chapter 3 provides the libraries, function calls, and sample programs related to the RCM2000.
Dynamic C has a number of standard features. • Full-feature source and/or assembly-level debugger, no in-circuit emulator required. • Royalty-free TCP/IP stack with source code and most common protocols. • Hundreds of functions in source-code libraries and sample programs: X Exceptionally fast support for floating-point arithmetic and transcendental functions. X RS-232 and RS-485 serial communication. X Analog and digital I/O drivers. X I2C, SPI, GPS, file system. X LCD display and keypad drivers.
3.2 Installing Dynamic C Insert the Dynamic C CD from the Development Kit in your PC’s CD-ROM drive. If the installation does not auto-start, run the setup.exe program in the root directory of the Dynamic C CD. Install any Dynamic C modules after you install Dynamic C. Dynamic C has two components that can be installed together or separately. One component is Dynamic C itself, with the development environment, support files and libraries.
3.3 Sample Programs To help familiarize you with the RCM2000 modules, Dynamic C includes several sample programs in the Dynamic C SAMPLES\RCM2000 directory. Loading, executing and studying these programs will give you a solid hands-on overview of the RCM2000’s capabilities, as well as a quick start with Dynamic C as an application development tool. These programs are intended to serve as tutorials, but then can also be used as starting points or building blocks for your own applications.
3.3.1 Running Sample Program FLASHLED.C This sample program will be used to illustrate some of the functions of Dynamic C. First, open the file FLASHLED.C, which is in the SAMPLES/RCM2000 folder. The program will appear in a window, as shown in Figure 5 below (minus some comments). Use the mouse to place the cursor on the function name WrPortI in the program and type . This will bring up a documentation box for the function WrPortI.
• A message reports “No Rabbit Processor Detected” in cases where the RCM2000 and the Prototyping Board are not connected together, the wall transformer is not connected, or is not plugged in. (The red power LED lights whenever power is connected.) • The programming cable must be connected to the RCM2000. (The colored wire on the programming cable is closest to pin 1 on header J3 on the RCM2000, as shown in Figure 4.) The other end of the programming cable must be connected to the PC serial port.
You can set break points while the program is running by positioning the cursor to a statement and using the F2 key. If the execution thread hits the break point, a break point will take place.You can toggle the break point off with the F2 key and continue execution with the F9 key. Try this a few times to get the feel of things. 3.3.1.4 Editing the Program Click on the Edit box on the task bar. This will set Dynamic C into the edit mode so that you can change the program.
• Setting break points. The F2 key is used to turn on or turn off (toggle) a break point at the cursor position if the program has already been compiled. You can set a break point if the program is paused at a break point. You can also set a break point in a program that is running at full speed. This will cause the program to break if the execution thread hits your break point. • Watch expressions. A watch expression is a C expression that is evaluated on command in the watch window.
#define DS2 0 #define DS3 1 // predefine for LED DS2 // predefine for LED DS3 // This cofunction flashes LED on for ontime, then off cofunc flashled[4](int led, int ontime, int offtime) { for(;;) { waitfor(DelayMs(ontime)); WrPortI(PADR,&PADRShadow,(1<
3.3.1.8 Advantages of Cooperative Multitasking Cooperative multitasking, as implemented with language extensions, has the advantage of being intuitive. Unlike preemptive multitasking, variables can be shared between different tasks without having to take elaborate precautions. Sharing variables between tasks is the greatest cause of bugs in programs that use preemptive multitasking.
3.3.2 Getting to Know the RCM2000 The following sample programs can be found in the SAMPLES\RCM2000 folder. • EXTSRAM.C—demonstrates the setup and simple addressing to an external SRAM. This program first maps the external SRAM to the I/O Bank 0 register with a maximum of 15 wait states, chip select strobe (which is ignored because of the circuitry), and allows writes. The first 256 bytes of SRAM are cleared and read back. Values are then written to the same area and are read back.
• FLASHLEDS.C—demonstrates the use of coding with assembly instructions, cofunctions, and costatements to flash LEDs DS2 and DS3 on the Prototyping Board on and off. LEDs DS2 and DS3 are controlled by Parallel Port A bit 0 (PA0) and Parallel Port A bit 1 (PA1).Once you have compile this program and it is running, LEDs DS2 and DS3 will flash on/off at different rates. • FLASHLEDS2.C—demonstrates the use of cofunctions and costatements to flash LEDs DS2 and DS3 on the Prototyping Board on and off.
• LCD_DEMO.C—demonstrates a simple setup for an LCD that uses the HD44780 controller or an equivalent. Connect the LCD to the RCM2000 address and data lines on the Prototyping Board.
3.3.3 Serial Communication The following sample programs can be found in the SAMPLES\RCM2000 folder. PWR D2 S1 PA1 S2 DS3 S3 PA0 PB2 2 23 X A M DS1 DS2 JP1DS2 U1 C1+ RESET J5 RN1 S2 DS3 PB3 S3 C2 U2 C3 RS-232 C4 C5 J6 RXC TXC Two sample programs, CORE_FLOWCONTROL.C and CORE_PARITY.C, are available to illustrate RS-232 communication.
3.4 Upgrading Dynamic C Dynamic C patches that focus on bug fixes are available from time to time. Check the Web sites • www.zworld.com/support/ or • www.rabbitsemiconductor.com/support/ for the latest patches, workarounds, and bug fixes. 3.4.1 Add-On Modules Dynamic C installations are designed for use with the board they are included with, and are included at no charge as part of our low-cost kits.
30 RabbitCore RCM2000
NOTICE TO USERS Z-WORLD PRODUCTS ARE NOT AUTHORIZED FOR USE AS CRITICAL COMPONENTS IN LIFESUPPORT DEVICES OR SYSTEMS UNLESS A SPECIFIC WRITTEN AGREEMENT REGARDING SUCH INTENDED USE IS ENTERED INTO BETWEEN THE CUSTOMER AND Z-WORLD PRIOR TO USE.
32 RabbitCore RCM2000
INDEX A M additional information online documentation .......... 5 references ............................ 4 models factory versions ................... 1 software sample programs ............... 18 specifications physical and electrical ......... 2 P T pinout RCM2000 ............................ 2 power supply connections ....................... 11 programming cable RCM2000 connections ..... 10 Prototyping Board ................... 8 features ................................ 8 mounting RCM2000 .....
User’s Manual 34
SCHEMATICS 090-0097 RCM2000 Schematic www.rabbitsemiconductor.com/documentation/schemat/090-0097.pdf 090-0099 RCM2000 Prototyping Board Schematic www.rabbitsemiconductor.com/documentation/schemat/090-0099.pdf 090-0128 Programming Cable Schematic www.rabbitsemiconductor.com/documentation/schemat/090-0128.pdf The schematics included with the printed manual were the latest revisions available at the time the manual was last revised.