Toll Free: 1-888-865-6888 Tel: 510-226-8368 Fax: 510-226-8968 Email: sales@RackmountMart.
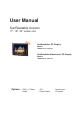
User Manual SunReadable Solution 17", 19", 22" screen size SunReadable LCD Display Models LCDR7U17-04 / 8U19-04 SunReadable Widescreen LCD Display Models LCDR7U19-03 / 8U22-03 Options : - BNC + S-Video - Audio - DVI - Quad Display - Touchscreen - DC power
Contents Chapter 1 Getting Started Important Safeguards Regulatory Notice Before Installation Unpacking Optional Accessories Peripheral Products Chapter 2 LCDR7U17-04 / 8U19-04 Package Contents Installation Structure Diagram Connection Chapter 3 LCDR7U19-03 / 8U22-03 Package Contents Structure Diagram Connection Installation Chapter 4 Operation On-screen Display Operation On-screen Menu Chapter 5 Optional Specification DVI-D Option BNC + S-Video Option Audio Option Touchscreen Options Front NEMA /
Chapter 1 1.1 Important Safeguards Please read all of these instructions carefully before you use the device. Save this manual for future reference. What the warranty does not cover ■ ■ Any product, on which the serial number has been defaced, modified or removed.
Chapter 1 1.2 Regulatory Notice Legal Information First English printing, October 2002 Information in this document has been carefully checked for accuracy; however, no guarantee is given to the correctness of the contents. The information in this document is subject to change without notice. We are not liable for any injury or loss that results from the use of this equipment. Safety Instructions ■ ■ Unplug equipment before cleaning. Don’t use liquid or spray detergent; use a moist cloth.
Chapter 1 1.3 Before Installation ■ ■ ■ ■ It is very important to locate the Rackmount LCD Drawer / Display in a suitable environment. The surface for placing and fixing the Rackmount LCD Drawer / Display should be stable and level or mounted into a suitable cabinet. Make sure the place has good ventilation, is out of direct sunlight, away from sources of excessive dust, dirt, heat, water, moisture and vibration.
Chapter 1 1.6 Peripheral Products Item Matrix Cat6 KVM Matrix DB-15 KVM Combo Cat6 KVM Combo DB-15 KVM PS/2 DB-15 KVM Keyboard Drawer Model No.
Chapter 2 2.1 Package Contents LCDR7U17-04 / 8U19-04 1 4 2 5 3 al User Manu 1 Rackmount LCD display x 1 pc 2 6' VGA cable (male to male) x 1 pc 3 User manual x 1 pc 4 Power cord x 1 pc 5 Auto switch power adapter x 1 pc P.
Chapter 2 2.2 Installation LCDR7U17-04 / 8U19-04 ■ Install each screw shown in Figure 1. ■ Fixed the LCD into the rack. Figure 1. * M6 screws are not provided. Figure 2. P.
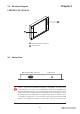
Chapter 2 2.3 Structure Diagram LCDR7U17-04 / 8U19-04 2 1 1 LCD interchangeable module kit 2 LCD membrane 2.4 Connection DB-15 VGA female connector Power input Caution : The Rackmount LCD Drawer & Display are hot-pluggable, but components of connected devices, such as the servers and KVM switch, may not be hot-pluggable. Plugging and unplugging cables while servers and KVM are powered on may cause irreversible damage of the servers, KVM and Rackmount LCD Drawer.
Chapter 3 3.1 Package Contents LCDR7U19-03 / 8U22-03 1 4 2 5 3 al User Manu 1 Rackmount LCD display x 1 pc 2 6' VGA cable (male to male) x 1 pc 3 User manual x 1 pc 4 Power cord x 1 pc 5 Auto switch power adapter x 1 pc P.
Chapter 3 3.2 Structure Diagram LCDR7U19-03 / 8U22-03 1 2 1 LCD interchangeable module kit 2 LCD membrane 3.3 Connection LCDR7U19-03 / 8U22-03 DB-15 VGA female connector Power input Caution : The Rackmount LCD Drawer & Display are hot-pluggable, but components of connected devices, such as the servers and KVM switch, may not be hot-pluggable. Plugging and unplugging cables while servers and KVM are powered on may cause irreversible damage of the servers, KVM and Rackmount LCD Drawer.
Chapter 3 3.4 Installation LCDR7U19-03 ■ Install each screw shown in Figure 3. ■ Fixed the LCD into the rack. Figure 3. * M6 screws are not provided. Figure 4. P.
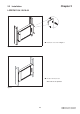
Chapter 3 3.4 Installation LCDR8U22-03 1 2 Figure 5. Figure 6. ■ ■ Install each screw shown in Figure 5. Insert the upper part of the LCD display to the rack shown in Figure 6. * M6 screws are not provided. 3 4 Figure 7. Figure 8. ■ ■ Push the lower part of the LCD into the rack. P.11 Installation completed.
Chapter 4 4.1 On-screen Display Operation LCDR7U17-04 / 8U19-04 / 7U19-03 / 8U22-03 LCD membrane Membrane Switch Function Power light Green = On Orange = Power saving Power on / off LCD Display the OSD menu Scrolls through menu options and adjusts the displayed control (To auto adjustment by pressing the button for 5 seconds) Exit the OSD screen Toggle analog, digital & video connection (DVI-D and video options only) P.
Chapter 4 4.2 On-screen Menu LCDR7U17-04 / 8U19-04 / 7U19-03 / 8U22-03 OSD Configuration Page Image: To enter into the brighness, contrast, color temp, red, green, and blue Geometry: To enter into the auto adjust, H position, V position, phase and clock Video: To enter into the colour, tint, sharpness, noise reduction, DCDi and TV Setup Audio: To enter into volume, bass, treble, balance, AVL and mute Misc: To enter into the language, OSD position, graphic mode, ratio, reset and timer P.
Chapter 5 5.1 DVI-D Option LCDR7U17-04 / 8U19-04 / 7U19-03 / 8U22-03 VGA Power DVI-D Remarks ■ Package includes 1 x 6ft DVI-D cable Chapter 5 5.2 BNC + S-Video Option LCDR7U17-04 / 8U19-04 / 7U19-03 / 8U22-03 S-Video BNC VGA P.
Chapter 5 5.3 Audio Option LCDR7U17-04 / 8U19-04 / 7U19-03 / 8U22-03 Audio VGA Power Remarks ■ Audio input is 35mm audio plug ■ The speaker is sharing the same power with LCD. P.
Chapter 5 5.
Chapter 5 5.5 Front NEMA 4 / IP65 Option LCDR7U17-04 / 8U19-04 / 7U19-03 / 8U22-03 3 1 2 4 1 Rear case 2 LCD panel 3 4mm protective glass (Front NEMA 4 / IP65 protection) 4 Aluminum front panel Remarks ■ 4mm thickness of protective glass is not toughened one, please handle it carefully. P.
Chapter 5 5.6 Quad Display Option Specifications RS-232 Alarm I/O VCR in VCR out Video IN 1~4 Video Loop 1~4 AV BNC Item Model Number VGA Power Description QD (NTSC) QD (PAL) Number of Color 16.7 M 16.7 M Imaging System NTSC PAL 1024 x 525 1024 x 625 60 50 Resolution Refresh Rate Video Input Video Output Camera Input 1.0 Vpp, 75 Ohm x 4 VCR Input 1.0 Vpp, 75 Ohm x 1 Live Monitor 1.0 Vpp, 75 Ohm x 1 Loop Through Out 1.0 Vpp, 75 Ohm x 4 VCR Output 1.
Chapter 5 5.7 DC Power Options LCDR7U17-04 / 8U19-04 / 7U19-03 / 8U22-03 VGA Model DC Power input 24V 48V 24-Volt 48-Volt 18 ~ 36V 36 ~ 75V - No load 50 mA 50 mA - Full load 4880 mA 2442 mA Output voltage: 12-Volt 12-Volt Output current: 8.3A 8.3A Efficiency 85% 86% Input rating Input voltage: Input range: Input current Output rating Remarks ■ Package does not include power cord and AC power adapter P.
Chapter 6 6.1 LCD Specification LCDR7U17-04 / 8U19-04 Item Description Grade A industrial TFT LCD panel LCD Grade Diagonal Size 17" TFT 19" TFT 1280 x 1024 1280 x 1024 800 800 Color Support 16.7 M 16.7 M Contrast Ratio (typ.) 800:1 800:1 Viewing Angle (H/V) 170˚ x 160˚ 160˚ x 160˚ 338 x 270 376 x 301 Tr Response Time (ms) 3.5 1.3 LCD Panel MTBF (hrs) 70,000 70,000 Max. Resolution Brightness (cd/m²) Display Area (mm) VGA Signal Input Sync. Type Analog RGB, 0.
Chapter 6 6.1 LCD Specification LCDR7U19-03 / 8U22-03 Item Description Grade A industrial TFT LCD panel LCD Grade Wide 19" TFT Wide 22” TFT 1440 x 900 1680 x 1050 800 600 Color Support 16.7 M 16.7 M Contrast Ratio (typ.) 900:1 900:1 Viewing Angle (H/V) 160˚ x 160˚ 170˚ x 160˚ 408 x 255 474 x 296 Tr Response Time (ms) 1.3 3.6 LCD Panel MTBF (hrs) 70,000 70,000 Diagonal Size Max. Resolution Brightness (cd/m²) Display Area (mm) VGA Signal Input Analog RGB, 0.7Vp-p Sync.
Chapter 7 7.1 Troubleshooting 1. How do I adjust the resolution? To change monitor resolution, click Start -> Control Panel -> Display. Select Setting tab to adjust the monitor resolution in Desktop Area. The available resolutions, "640 x 480", "800 x 600", "1024 x 768", "1152 x 864", "1280 x 1024", are determined by the display card in your computer. 2. Is interference signal appeared on LCD normal when shutting down the computer ? In rare cases, interference may appear on the monitor.
Chapter 8 8.1 Dimensions Model Product Dimension (W x D x H) Net Weight LCDR7U17-04 480 x 57 mm 18.9 x 2.2" 7U 7 kg 15 lb LCDR8U19-04 480 x 57 mm 18.9 x 2.2" 8U 8 kg 18 lb LCDR7U19-03 480 x 57.5 18.9 x 2.3" 7U 8 kg 18 lbs LCDR8U22-03 500.4 x 59.1 19.7 x 2.3" 8U 12 kg 26 lbs The company reserves the right to modify product specifications without prior notice and assumes no responsibility for any error which may appear in this publication.