RKP21x-208KVM Series RKP241x-208KVM Series USER’S MANUAL WHERE TO BUY http://www.rackmountnet.com 1933 O'Toole Ave, #A107 San Jose, CA 95131, USA Toll Free Tel: (866)955-0598 email: sales@rackmountnet.
Introduction Thank you for purchasing RKP215-208KVM Rackmount LCD Keyboard Drawer with 8 ports KVM switch. LCD Keyboard Drawer with 8 ports KVM switch is ideal for application where space is critical. RKP215-208KVM is a combination of keyboard, trackball, KVM switch and TFT LCD packed into a drawer with features such as monitor flip up design, adjustable mounting brackets, built in LCD OSD, centralized control of 8 PCs.
Packing Contents RKP215-208KVM LCD Keyboard Drawer with KVM switch User’s manual AC to DC Power Adapter w/power cord Rack Mount Kit Standard 3-in-1 KVM cable 1 PCS 1 PCS 1 PCS 1 SET 8 PCS Before Unpacking It is very important to locate the LCD Keyboard Drawer with KVM switch in a suitable environment. z The surface for placing and fixing the LCD Keyboard Drawer with KVM switch should be stable and level or mounted into a suitable cabinet.
Important Safeguards Please read all of these instructions carefully before you use the device. Save this manual for future reference. z Unplug the LCD Keyboard Drawer with KVM switch from the power outlet before cleaning. z Do not spray liquid cleaners or aerosol directly on the device. Wet a cloth with a neutral detergent (e.g. clean water) and squeeze it tight, then clean the screen slightly with it.
LCD Session Rev.
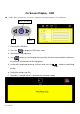
On Screen Display - OSD OSD is the convenient way for a user to adjust the screen performance to his satisfaction. Menu / Selection Left Right 1. Entering the OSD Meun 2. Press the to display the OSD main menu. 3. Selecting icons for adjusting 4. Use buttons to scroll through the icons within the main menu and other sub-menus the currently selected icon will be highlighted. 5. A slider bar is displayed whenever a value is to be sent. Use the bar. 6. Saving the settings and Exit 7.
8. Select “Auto” for autoadjust LCD quality Rev.
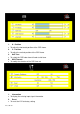
Customizing the Settings 1. Brightness • To perform brightness adjustment of the input RGB signal 2. Contrast • To adjust the contrast level of the input signal 3. Phase • To optimize the picture quality by adjusting the sampling clock of the input RGB Signal 4. Frequency • To adjust the frequency of the input signal to optimize the picture quality 5. H - Position • To adjust the horizontal position of the frame 6. V - Position • To adjust the vertical position of the frame 7.
1. H - Position • To adjust the horizontal position of the OSD frame 2. V - Position • To adjust the vertical position of the OSD frame 3. Half Tone • To switch the OSD color from full color to half tone 4. OSD Timeout • 1. To modify the duration of the OSD time-out Information • To display the existing input signal information 2. Reset • To reset the LCD to factory setting Rev.
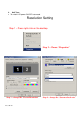
3. • Half Tone To switch LCD power ON/OFF auto mode Resolution Setting Step 1 – Press right click on the desktop Step 2 – Choose “Properties” Step 3 – change the “Screen Resolution” Rev.
FAQ My display doesn’t work, even though the computer appears to work 1. Make sure the power cable is securely plugged into the display 2. Make sure the display is turned on 3. Try turning the display off and then turning it on again 4. Make sure the display’s power cord is plugged into a power outlet and into the AC power adapter. Check to see whether the outlet works by plugging another device into the outlet 5.
FAQ – Sun Server Sun Server are using resolution at 1152 x 900 x 76Hz Supported resolution mode 640 x 480 x 70/75Hz 800 x 600 x 70/75Hz 1024 x 768 x 70/75Hz 1280 x 1024 x 75Hz (17” LCD) Note the Max. frequency of 13.3” is 70Hz You need to change the Sun Server resolution before you connect to LCD Display Please do the following procedure to change the resolution setting : 1. as root: you may find the following comment “/user/sbin/m64config” 2.
Technical Information LCD Video Power Management Control Size 17” Screen Type TFT Active Matrix Display Area 337.92mm(H) x 270.336mm(V) Contrast Ratio 350 : 1 Viewing Angle 150{ (H) x 125{ (V) Typ. Resolution XGA 1280 x 1024 Pixel pitch 0.264mm (H) x 0.264mm (W) Response Time Tr=5ms, Tf=20ms Typ Brightness 250 cd/m2 Panel Color 16.7M Colors Back Light 4 Lamps Synchronization Horizontal : 31-69 KHz Range Vertical : 56-75 Hz Input Signal Analog RGB 0.
KVM Session Rev.
KVM Bank Button Channel Button PS/2 Cable: Mini Din 6 pin Male to Male VGA Cable: HDB15 pin Male to Male Installation Before installation, please make sure all of peripherals and computers have been turned off. 1. Connect the Keyboard, VGA, Mouse cables to the computer ports of KVM switch 2. After Powering on computers and finishing the boot-up process, you can start to go KVM switch. Note: Please don’t switch the PC port (i.e.
Startup 1. Power on the KVM power 2. 7 segments LED is on 3. Key-in the password, default is “00000000” 4. If you forget your password, please send back to Manufacturer / Distributor 5.
Hot Key Press “Bank” & “Channel” at the same time to reset the KVM switch to default setting • S.L. + S.L. + Previous Channel • S.L. + S.L. + Next Channel Note: You also could press “up arrow key” or “down arrow key” longer time to speed up selecting the destination port • S.L. + S.L. + Page Up Previous Bank • S.L. + S.L. + Page Down Next Bank To Select PC port • S.L. + S.L. + Bank No. + Port No. • Bank No. 1 – 8 (Max.) Port No. 01 – 16 (Max.) • Example we select Bank 3 Channel 14 • S.L. + S.L.
Rev.
OSD Menu Bank No. BANK : 1 01 SYSTEM 01 02 SYSTEM 02 ( 03 SYSTEM 03 04 SYSTEM 04 05 SYSTEM 05 06 07 SYSTEM 07 08 SYSTEM 08 SYSTEM 06 PC Name List OSD : 1 0 SEC. CHANGE PASSWORD SCAN: 1 0 SEC. CONSOLE ON/OFF ESC : QUIT TAB : NEXT KVM Settings ENTER :COMPLETE INSERT :EDIT Ç/È: SELECT PORT Info. PgDn/PgUp: BANK SELECT Use “Tab” key to select items like Bank, OSD, SCAN, CHANGE PASSWORD, CONSOLE ON/OFF, etc… Use Page Up & Page Down to switch previous or next bank Rev.
OSD Menu BANK : 1 01 SYSTEM 01 02 SYSTEM 02 ( 03 SYSTEM 03 04 SYSTEM 04 05 SYSTEM 05 06 07 SYSTEM 07 08 SYSTEM 08 SYSTEM 06 OSD : 1 0 SEC. CHANGE PASSWORD SCAN: 1 0 SEC.
OSD - Password ENTER PASSWORD : █ ESC : QUIT ENTER : ENTER NEW PASSWORD : █ ESC : QUIT ENTER : COMPLETE • Changing Password • • • • • • Default password “00000000” Choose “Change Password” Key-in the existing password Enter the New Password Re-Enter the New Password Changing Password complete • Max.
Rev.
Cascade Using 3 in 1 KVM cable connect from Bank 1’s “Cascade port” to Bank 2’s “Console port”. After connected please press “Bank” & “Channel” button on the front of the KVM switch to reset the KVM switch. Bank 1 Bank 2 Bank 3 Bank 8 (Max) Cascade level Max. 8 level Max. PC connection is 128 (all using 16 ports) All KVM switch is compatible & can cascade with each other Using 3 in 1 KVM cable to cascade Normal distance from one KVM to another is 15ft Rev.
FAQ 1. Don’t press any keys on the keyboard while the selected computer is booting up. Otherwise, it might cause the keyboard error or keyboard is not detected at PC side. 2. The computer boot up fine, but keyboard doesn’t work z Make sure the keyboard works when directly plugged into the computer. z Try a different keyboard, but use only 101, 102 or 104-key keyboard. 3. The Mouse is not detected during PC boot up. z Make sure the mouse works when directly plugged into the computer.
Technical Information 8 Ports KVM Switch PC Port PC Port Connector (All Female Type) 8 PC selection 7 segment LED On Screen Display Control Scan Intervals Keyboard Emulation Mouse Emulation VGA Resolution Bandwidth Daisy Chain MAX Level MAX PC Connection Housing Power Adapter Operation Temperature PS/2 Keyboard mini Din 6 pin PS/2 Mouse Mini Din 6 pin VGA HDDB 15pin PS/2 Keyboard mini Din 6 pin PS/2 Mouse Mini Din 6 pin VGA HDDB 15pin On Screen Display Manual, Hot Key, Push Button One Bank LED, Two PC P