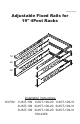
Patent(s) Pending Adjustable Fixed Rails for 19" 4Post Racks 1U 2U 3U Installation Instructions Kit P/N: 1UKIT-109 1UKIT-109-20 1UKIT-109-31 2UKIT-109 2UKIT-109-20 2UKIT-109-31 3UKIT-109 3UKIT-109-20 3UKIT-109-31 109-2469
Kit Contents Components: (1) (1) (2) (1) (1) Left Fixed Rail Right Fixed Rail Rear Brackets Cable Crossbar 30” Velcro Cable Tie Assembly Hardware Kit: (8) (8) 8-32 Flat Head Screws 8-32 Nuts Cage Nuts for Equipment Thumb Screws: (2) 10-32 Cage Nuts (2) 12-24 Cage Nuts (2) M6 Cage Nuts “Silver” “Black” “Gold” (Dell Standard) (HP-Compaq Standard) Rack Hardware Kit (2 bags): (12) (12) (12) (12) 10-32 Pan Head Screws 12-24 Pan Head Screws 12-24 Cage Nuts 12-24 Square Nuts Rack Hole Type Hardware Used
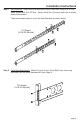
Installation Instructions Step 1. Rail Assembly: Attach the Rear Brackets to each Fixed Rail using (4) 8-32 Flat Head Screws and (4) 8-32 Nuts. Always install the (4) screws and nuts as widely spaced as possible. There are multiple ways to orient the Rear Brackets as shown below. 1U Shown (2U & 3U Similar) Step 2. Front Rack Attachment: Attach the front of each Fixed Rail to the rack using hardware from the Rack Hardware Kit (see Page 2).
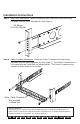
Installation Instructions Step 3. Rear Rack Attachment: Attach the back of each Fixed Rail to the rack using hardware from the Rack Hardware Kit (see Page 2). 2U Shown (1U & 3U Similar) Step 4. Cable Crossbar Attachment: Attach the Cable Crossbar to the rack using hardware from the Rack Hardware Kit (see Page 2). The Cable Crossbar can be co-located with the Fixed Rails (as shown below). The Cable Crossbar can be installed in other locations as needed.