
User's Manual


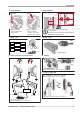
Table Of Contents
- RAy2 Microwave Link
- Table of Contents
- Important Notice
- Quick guide
- List of documentation
- 1. RAy2 – Microwave Link
- 2. Implementation Notes
- 3. Product
- 4. Accessories
- 5. Step-by-step Guide
- 6. Installation
- 7. Configuration
- 8. Command Line Interface
- 9. Troubleshooting
- 10. Technical parameters
- 11. Safety, environment, licensing
- Appendix A. Antenna dimensions
- Appendix B. Rain zone map
- Appendix C. IP address in the PC (Windows XP)
- Appendix D. IP address in the PC (Windows 7)
- Appendix E. IP address in the PC (Windows 8)
- Appendix F. SSH key generation
- Appendix G. Https certificate
- Appendix H. Unit block diagrams
- Index
- Appendix I. Revision History

Quick guide
Accessing units
— Default IP addresses: 192.168.169.169/24 (L unit) Username: admin
192.168.169.170/24 (U unit) Password: admin
Set computer IP address within the IP range 192.168.169.1-255.
— Web browser access – https://192.168.169.169 (L unit)
or https://192.168.169.170 (U unit).
Accept the https security certificate issued by RACOM.
— If the units are linked to each other, the status indicator in management interface states “OK”
and status LED “AIR” lights green. If not, utilize the antenna alignment. (see pict. 11)
Configuration and backup of basic parameters
Set bandwidth, TX/RX channel, TX modulation, RF power, IP addresses (do not use
the default ones), Access channels (ssh, https, …).
Reboot both units and check the link status (to verify that the parameters are saved correctly)
Backup the configuration in the Tools – Maintenance – Backup – Settings menu.
Store the backup file to your PC.
2. Accessories
Voltmeter
Antenna brackets
Antennas
Power supply
Required tools
1. Delivered items
RAy2
Plugs
Grease
Bushings
7×
2×
1×RJ45
1×
1×DC
3×3×
Connectors
4. RAy unit and antenna lubrication
Grease
Antenna
RAy2
3. Bracket and antenna mounting
Mounting
- right sided (pictured below)
- left sided
RAy2 Microwave Link – © RACOM s.r.o.8
Quick guide