
User's Manual


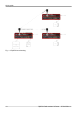
Table Of Contents
- RipEX2 Radio modem & Router
- Table of Contents
- Important Notice
- 1. Quick guide
- 2. Product
- 3. Accessories
- 4. Installation
- 5. RipEX2 in detail
- 6. Web interface
- 7. Settings
- 7.1. Interfaces
- 7.1.1. Ethernet
- 7.1.2. Radio
- 7.1.3. COM
- 7.1.4. Terminal servers
- 7.1.5. Cellular
- 7.2. Routing
- 7.2.1. Static
- 7.2.2. OSPF
- 7.2.2.1. Description
- 7.2.2.2. Common - Common settings
- 7.2.2.3. Network - Areas and interfaces - Areas
- 7.2.2.4. Network - Areas and interfaces - Interfaces
- 7.2.2.5. Network - Areas and interfaces - Neighbors
- 7.2.2.6. Network - Areas and interfaces - Networks
- 7.2.2.7. Static rules
- 7.2.2.8. Import filter
- 7.2.2.9. Export filter
- 7.2.3. BGP
- 7.3. Firewall
- 7.4. VPN
- 7.5. Security
- 7.6. Device
- 7.7. Advanced
- 7.1. Interfaces
- 8. Diagnostics
- 9. Technical parameters
- 10. Safety, regulations, warranty
- 10.1. Frequency
- 10.2. Safety distance
- 10.3. High temperature
- 10.4. Battery disposal
- 10.5. Instructions for Safe Operation of Equipment
- 10.6. SW license
- 10.7. EU Compliance
- 10.8. Compliance Federal Communications Commission and Innovation, Science and Economic Development Canada
- 10.9. Compliance ANATEL Brasil
- 10.10. Warranty
- 10.11. RipEX2 Availability and service life time
- 10.12. RipEX2 maintenance
- Appendix A. Abbreviations
- Index
- Revision History

1. Quick guide
RipEX2 is a widely configurable compact radio modem, more precisely a radio IP router. All you have
to do to put it into operation is to connect it to an antenna and a power supply and configure it using a
PC (tablet, smartphone) and a web browser.
Fig. 1.1: Connecting RipEX2 to a PC over WiFi, ETH/USB adapter, ETH interface
Default password for "admin" account is "admin". Change the password before deploying unit
to a network.
To configure RipEX2 you can connect it to your PC in three ways:
• PC (tablet, smartphone) connected via WiFi adapter
External WiFi adapter Part No. OTH-USB/WIFI-W2 (an optional accessory of the RipEX2 see
ETH/USB adapter
1
) needs to be used. Any other adapter will not work correctly when connected to
RipEX2 unit. Connect your PC, tablet or smartphone to RipEX2 WiFi AP first. Its default SSID is
RipEX2 S/N. By default, the WPA2 PSK is disabled, so no password is required. The WiFi adapter
contains a built-in DHCP server, so if you have a DHCP client in your PC (as most users do), you
do not need to set anything up. The default IP address of RipEX2 unit, for access over the ETH/USB
adapter, is 10.9.8.7.
• PC connected via ETH/USB adapter
External ETH/USB adapter Part No. OTH-USB/ETH-XR (an optional accessory of the RipEX2 see
ETH/USB adapter
2
). The ETH/USB contains a built-in DHCP server, so if you have a DHCP client
in your PC as most users, you do not need to set anything up. The default IP address of RipEX2
unit, for access over the ETH/USB adapter, is 10.9.8.7.
1
https://www.racom.eu/eng/products/radio-modem-ripex.html#accessories_ethusb
2
https://www.racom.eu/eng/products/radio-modem-ripex.html#accessories_ethusb
RipEX2 Radio modem & Router – © RACOM s.r.o.8
Quick guide